
User Guide
Pick your role, then the task you want to do. The numbers on each screenshot show exactly where to tap.
Screenshots are taken from a demo account filled with sample data. The app itself is in Turkish.
Getting started
Signing in, passwords and settings.
Getting started
Sign in to the app
Download Fırın Paneli from the App Store or Google Play. Your branch manager creates your account; you can sign in once you click the verification link sent to your e-mail.
-
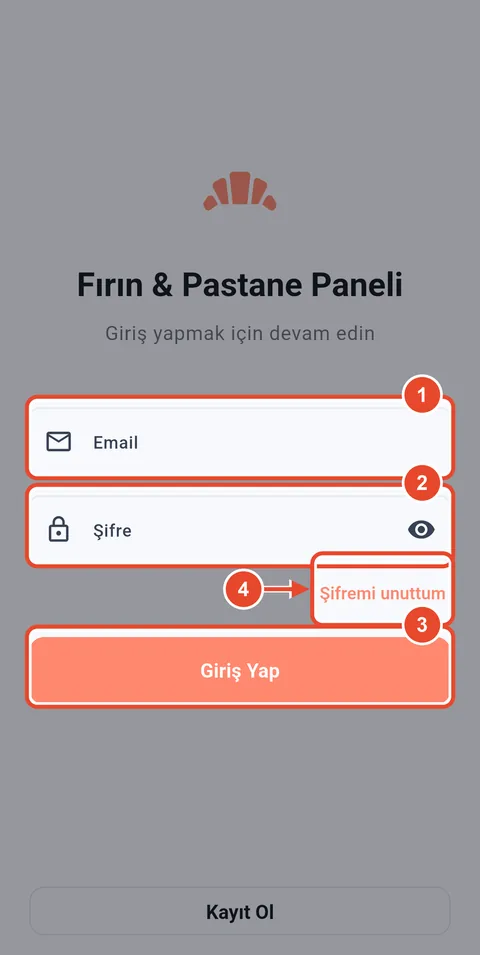
Step 1Mobile app
Sign-in screen
After signing in you land on the screen for your role: bakers see their production list, drivers the delivery screen, managers the management panel.
- Enter your e-mail address (E-posta).
- Enter the password you were given (Şifre).
- Tap Giriş Yap (Sign in).
- Forgot your password? Request a reset link here (Şifremi unuttum).
Getting started
Dark mode and signing out
Open Settings from the gear icon at the top right.
-
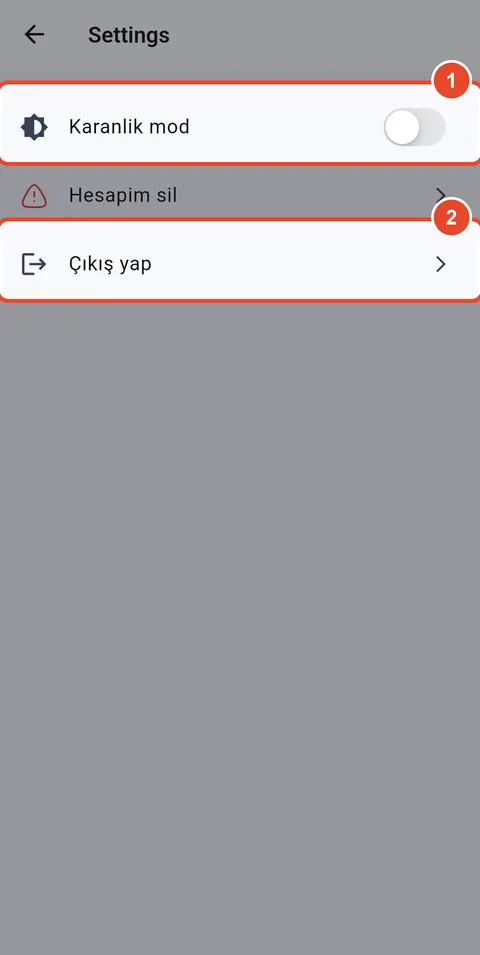
Step 1Mobile app
Settings
Turn on dark mode for night shifts. Sign out before handing the phone to someone else.
- Turn dark mode (Karanlık mod) on or off.
- Sign out (Çıkış yap).
Company owner
Open branches, assign branch managers and follow every branch from one place.
Company owner
Manage your branches in the app
When a company owner signs in, the Şirket Yönetimi (company management) screen opens. From here you can switch to any branch or open a new one.
-
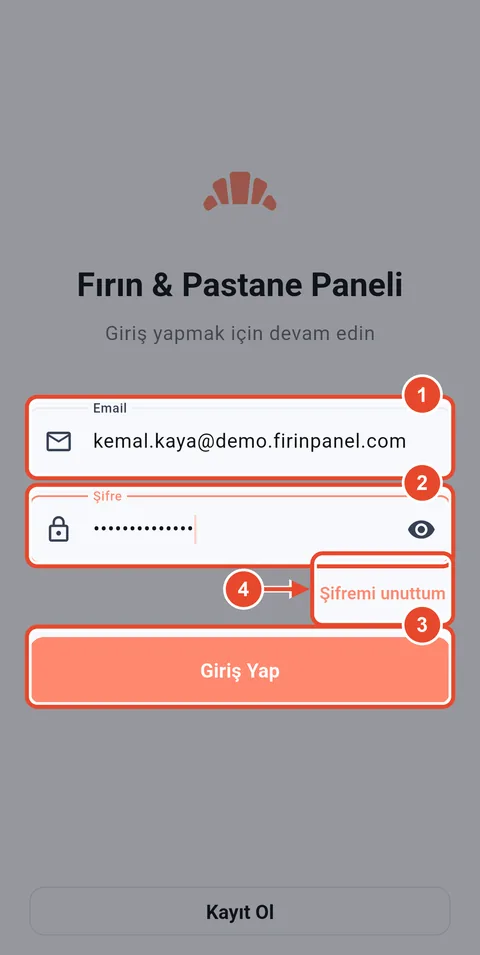
Step 1Mobile app
Sign in as company owner
The Fırın Paneli team creates your company owner account. Sign in with your e-mail and password.
- Your company owner e-mail.
- Your password.
- Tap Giriş Yap.
- Forgot your password? Request a reset link.
-
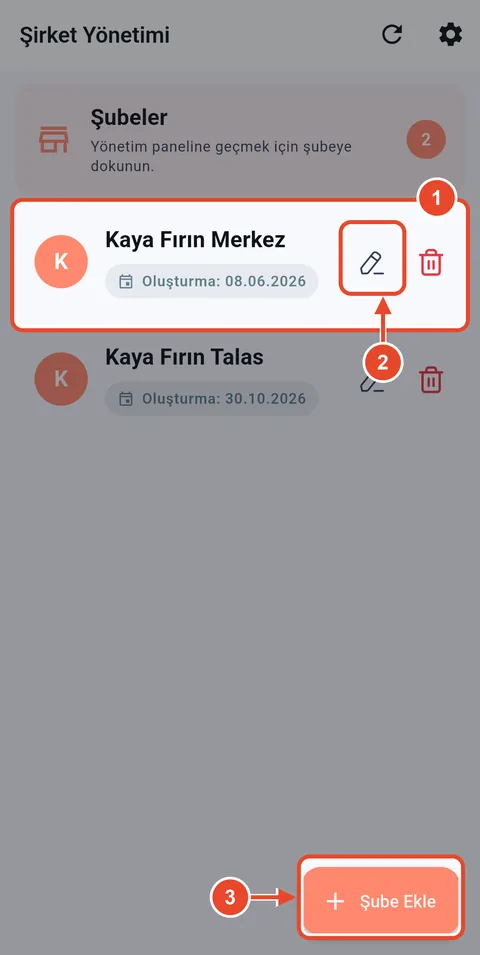
Step 2Mobile app
Company management
All of your branches are listed here.
- Tap a branch to open its management panel.
- Tap the pencil to rename the branch.
- Tap Şube Ekle to open a new branch.
-
Step 3Mobile app
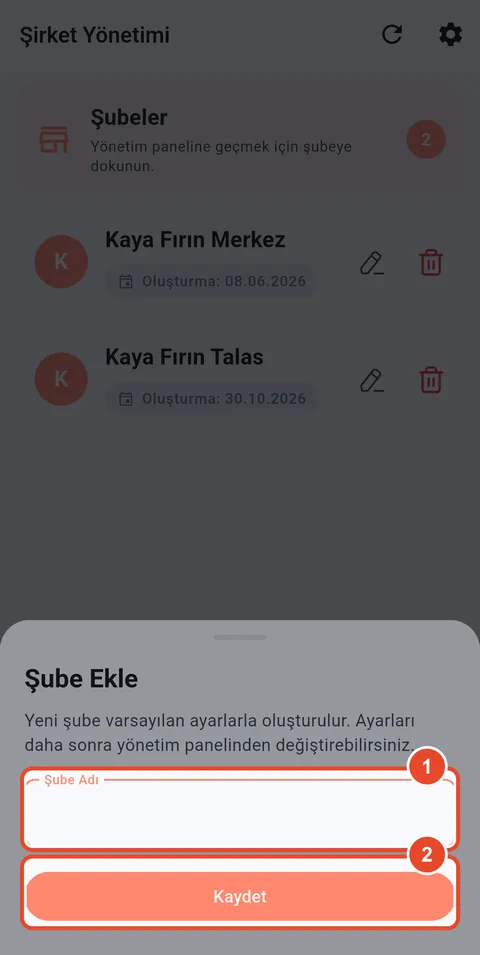
Open a new branch
A new branch starts with sensible defaults: a bread price, the delivery types and one expense type. You finish the rest from the branch panel.
- Enter the branch name (e.g. Kaya Fırın Talas).
- Tap Kaydet (Save).
-
Step 4Mobile app
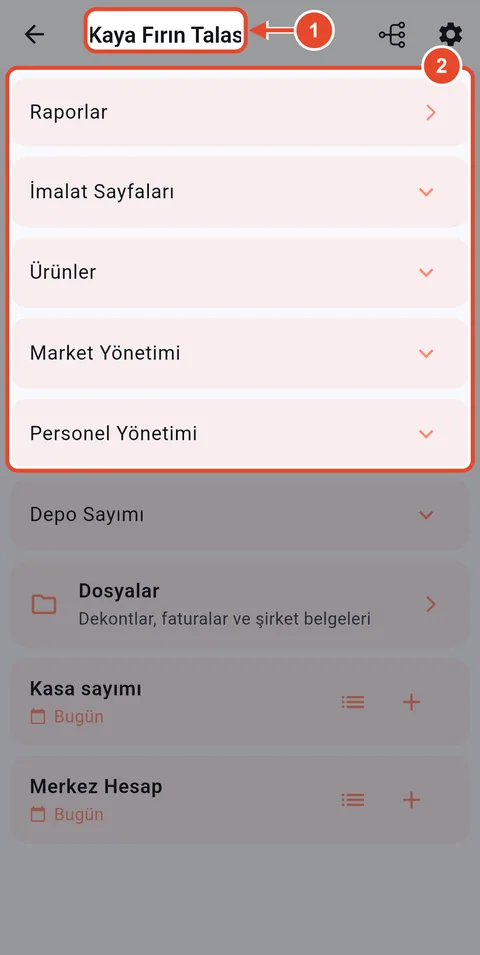
Open the branch panel
Tapping a branch opens the same panel the branch manager sees. See the Branch manager section for details.
- The title shows which branch you are in.
- Every section of the branch: reports, production pages, products, markets and staff.
Company owner
Add and edit branches on the web panel
To work from a computer, open panel.firinpanel.com. The web panel is for company owners and branch managers; staff use the mobile app.
-
Step 1Web panel
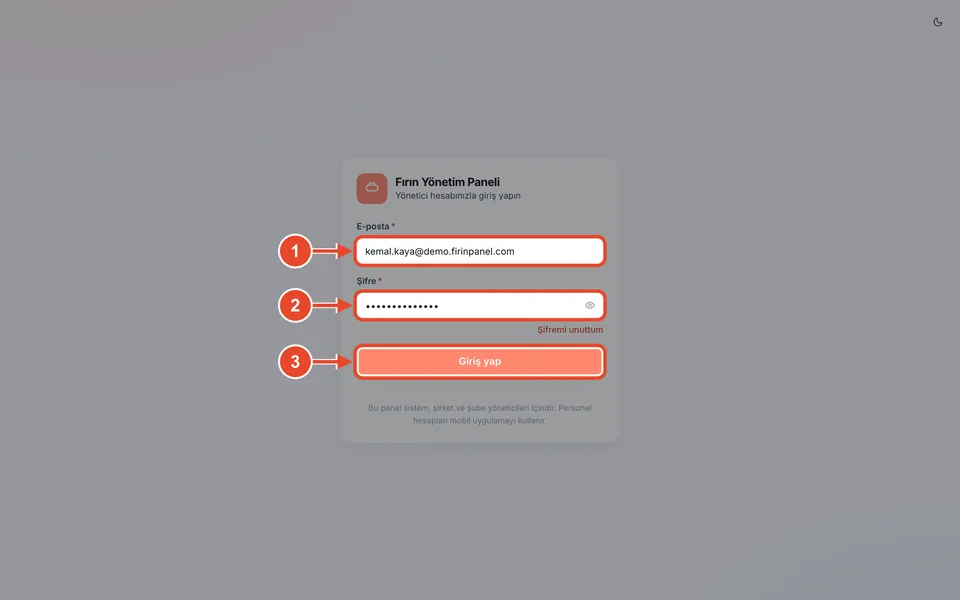
Sign in to the web panel
Open panel.firinpanel.com and sign in with the same account you use in the app.
- Your e-mail.
- Your password.
- Click Giriş yap.
-
Step 2Web panel
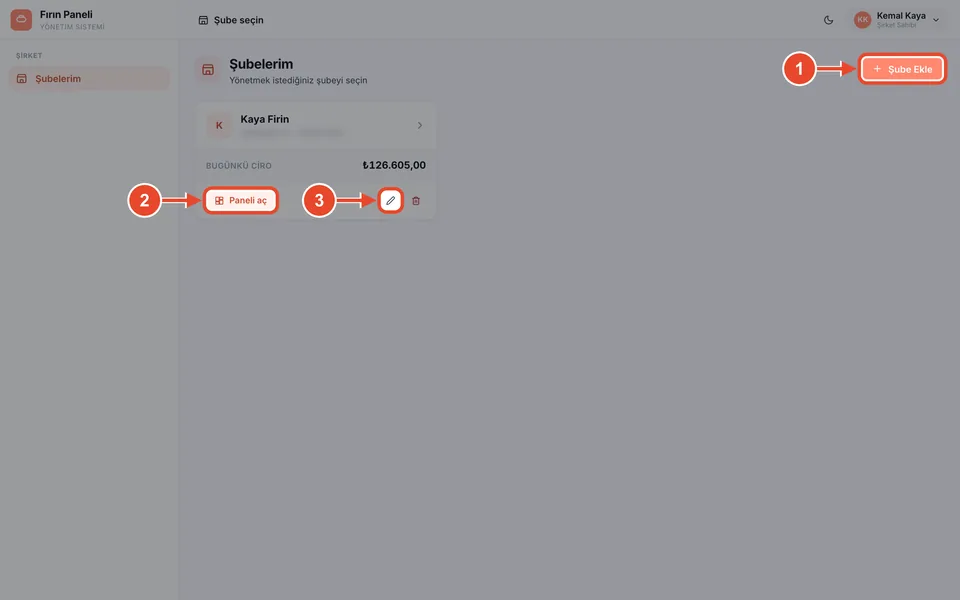
My branches
After signing in you see every branch with today's revenue.
- Click Şube Ekle to add a branch.
- Click Paneli aç to open the branch panel.
- Click the pencil to rename the branch.
-
Step 3Web panel
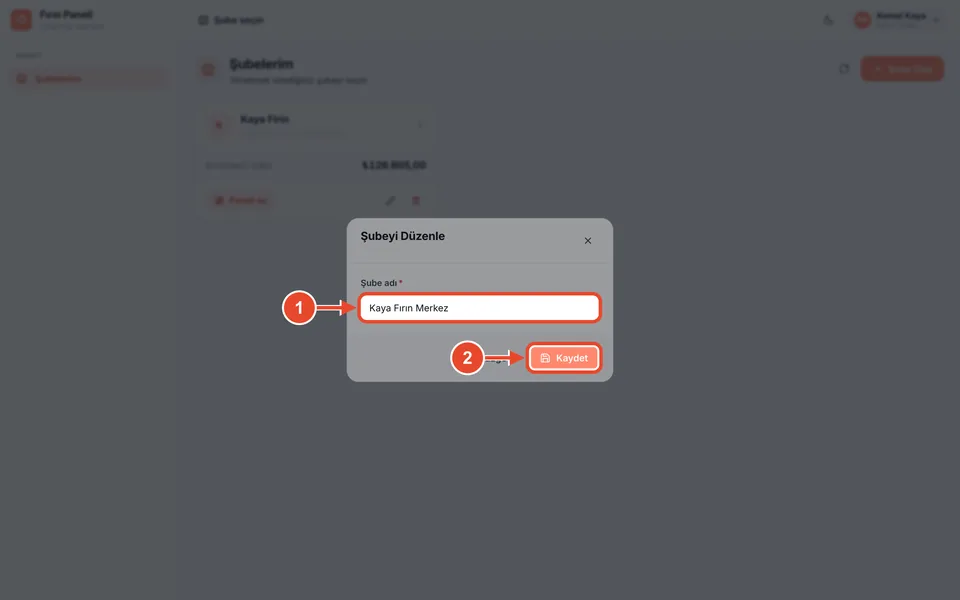
Rename a branch
Write the full branch name with Turkish characters; it appears at the top of every report.
- Type the new branch name.
- Click Kaydet.
-
Step 4Web panel
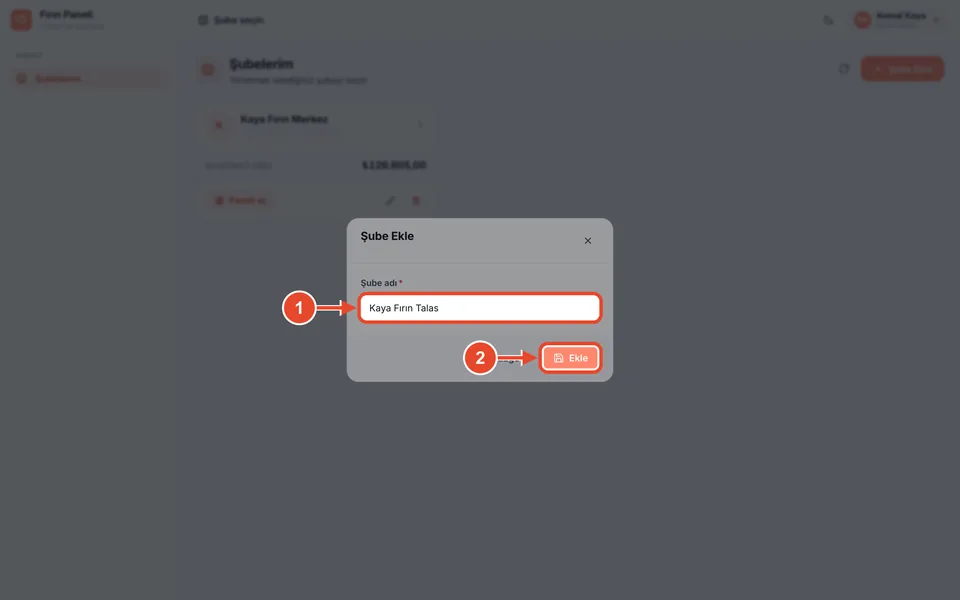
Add a new branch
- Type the branch name.
- Click Ekle (Add).
-
Step 5Web panel
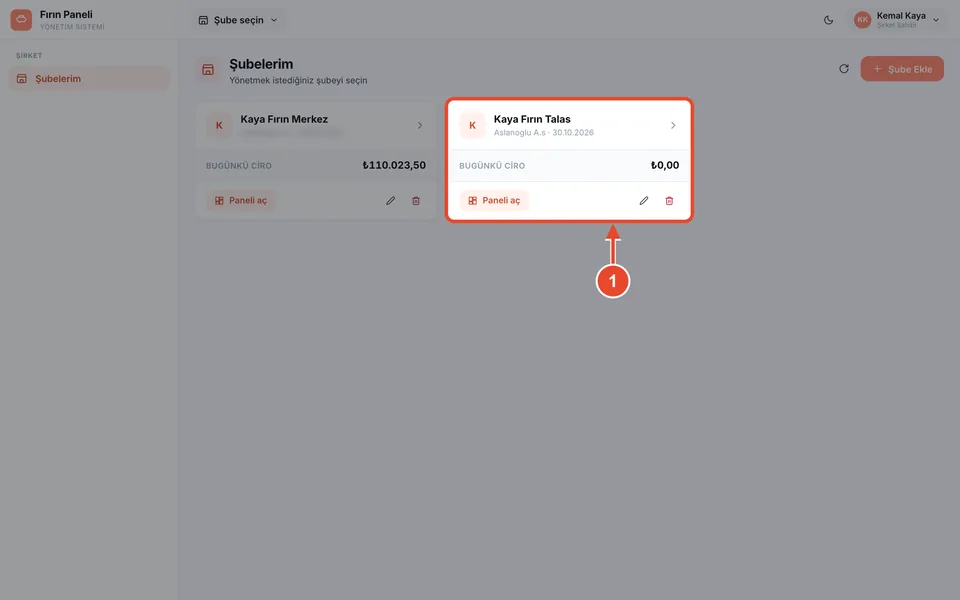
Branch added
The new branch appears in the list with today's revenue. Delivery types are created automatically.
- The new branch. Start setting it up with Paneli aç.
Company owner
Assign a branch manager
Each branch is run day to day by a branch manager. You create the manager's account on the web panel.
-
Step 1Web panel
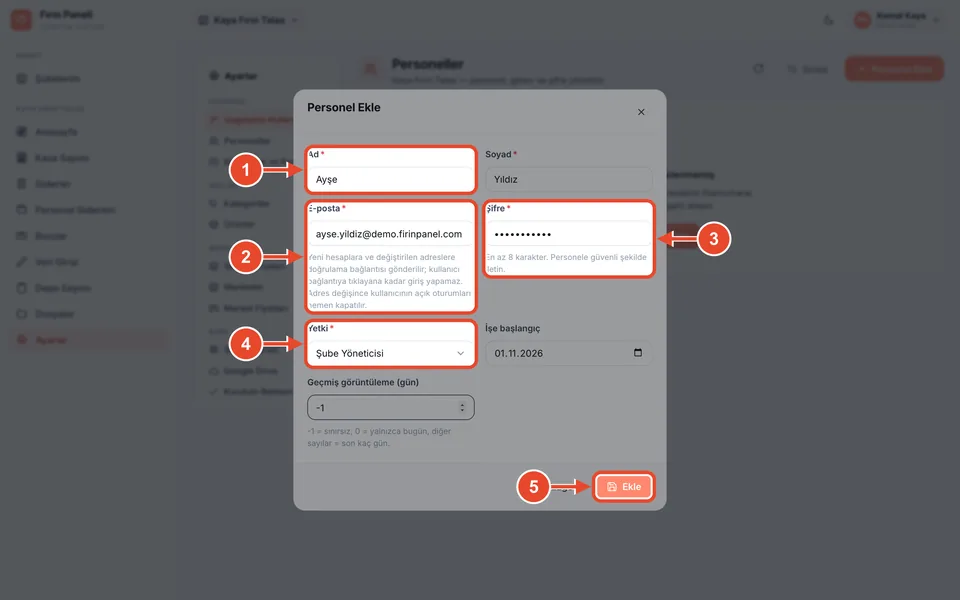
Create the manager account
Open the branch panel, then Ayarlar › Uygulama Kullanıcıları › Personel Ekle.
- First and last name.
- The manager's e-mail. The verification link goes here.
- A temporary password (at least 8 characters).
- Choose Şube Yöneticisi (branch manager) as the permission.
- Click Ekle.
-
Step 2Web panel
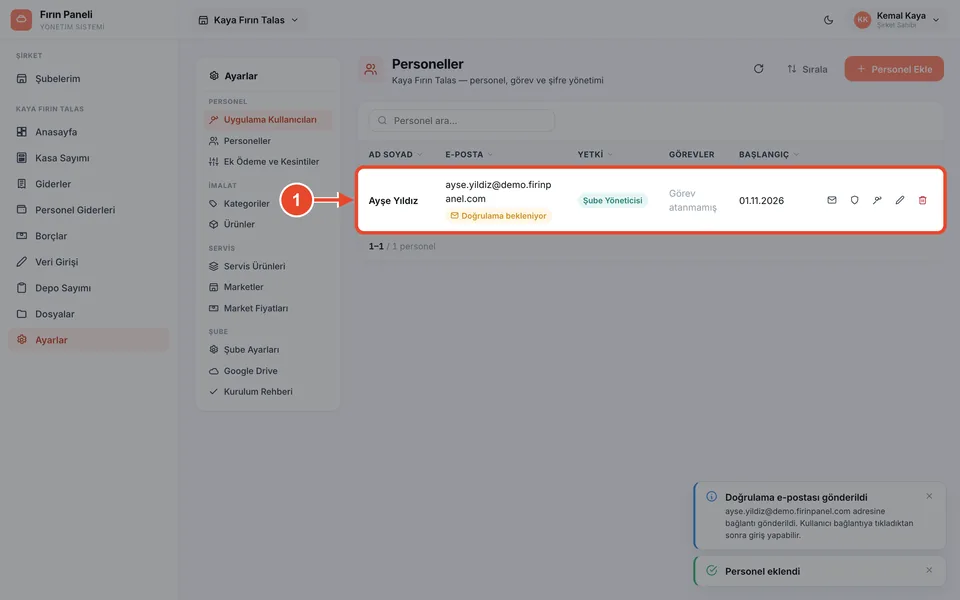
Waiting for verification
The manager can sign in after clicking the link in their e-mail. If it did not arrive, resend it with the envelope icon on the row.
- The new manager account. The label disappears once the e-mail is verified.
Branch manager
Products, markets, staff, payroll, cash and reports.
Branch manager
Tour of the management panel
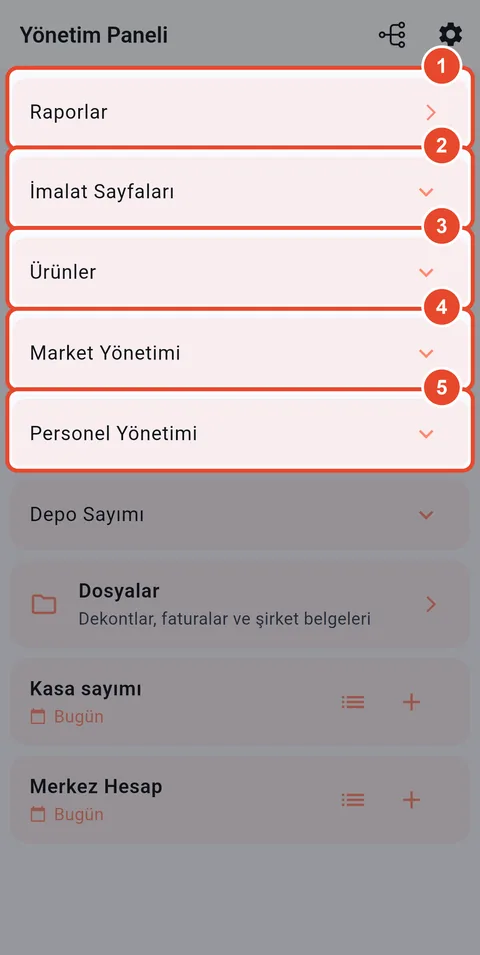
When a branch manager signs in, the Yönetim Paneli (management panel) opens. Everything starts from the sections on this screen.
-
Step 1Mobile app
Panel sections (1)
Tap a section to unfold the pages inside it.
- Raporlar: general account, production and market reports (PDF).
- İmalat Sayfaları: the screens bakers, drivers and the counter use.
- Ürünler: products and categories.
- Market Yönetimi: markets, market prices and delivery products.
- Personel Yönetimi: payroll, payroll settings and app users.
-
Step 2Mobile app
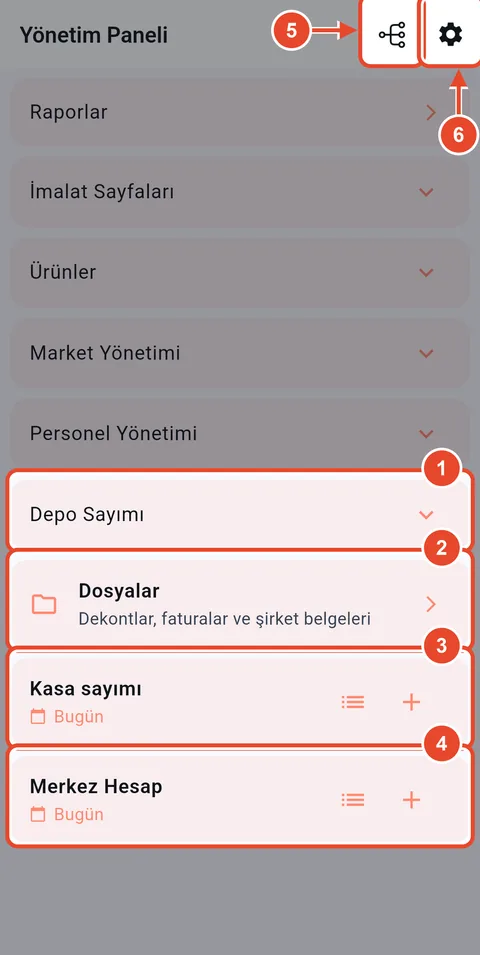
Panel sections (2)
- Depo Sayımı: monthly stock count.
- Dosyalar: receipts, invoices and company documents.
- Kasa sayımı: view or add today's cash count.
- Merkez Hesap: post the day's account to head office.
- Business settings: bread price, daily consumption and expense types.
- App settings: dark mode and sign out.
-
Step 3Mobile app
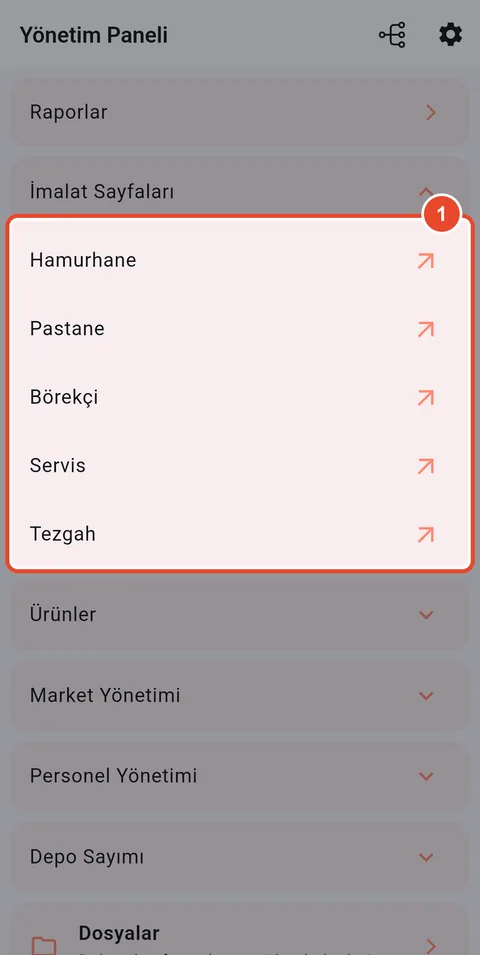
Check the staff screens
From İmalat Sayfaları you can open exactly what your bakers, driver and counter staff see, and fill in anything they missed.
- The Hamurhane, Pastane, Börekçi, Servis and Tezgah screens.
Branch manager
Add products from the ready-made catalogue (web)
Instead of typing products one by one, pick them from the ready-made catalogue and copy them into your branch. Adjust the prices afterwards.
-
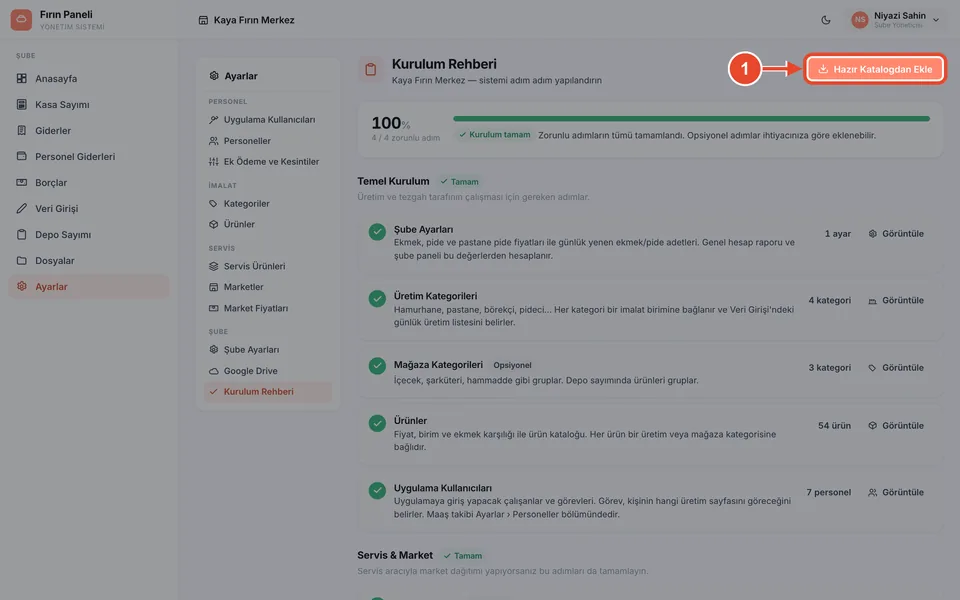
Step 1Web panel
Setup guide
On the web panel open Ayarlar › Kurulum Rehberi (setup guide). It shows which steps are still missing.
- Click Hazır Katalogdan Ekle (add from catalogue).
-
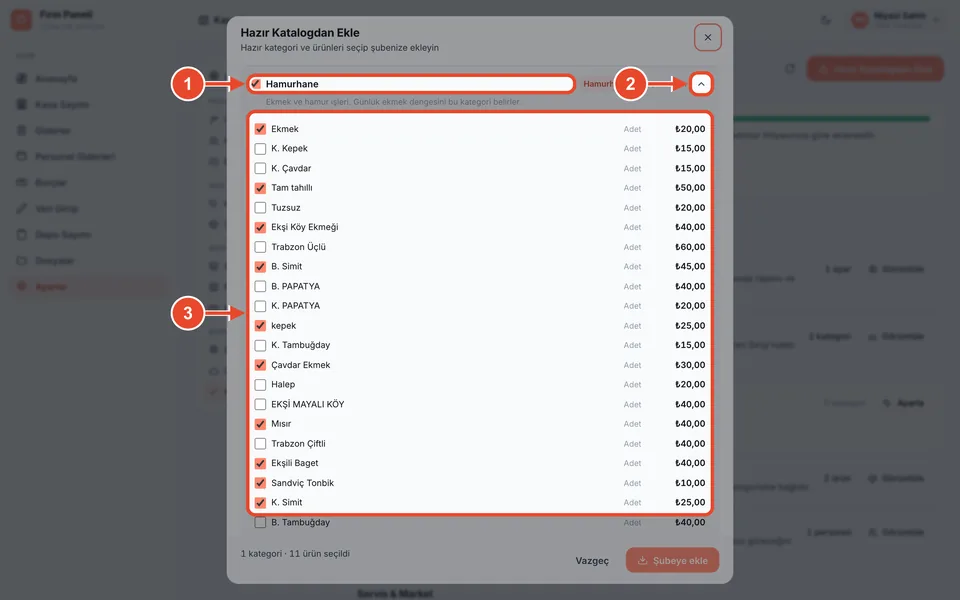
Step 2Web panel
Choose categories and products
Production categories such as Hamurhane, Pastane, Börekçi and Pideci and store categories such as drinks and raw materials are ready to use.
- Tick the category.
- Unfold its products with the arrow.
- Tick the products you sell and leave the rest unticked.
-
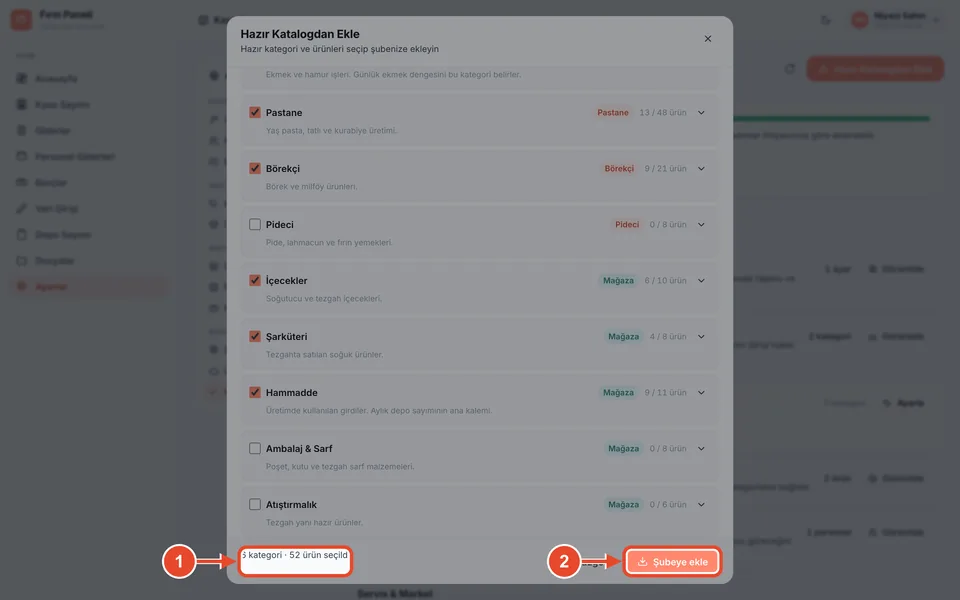
Step 3Web panel
Add them to the branch
Records that already exist in the branch with the same name are skipped, so running this again later is safe.
- Check how many categories and products you picked.
- Click Şubeye ekle (add to branch).
Branch manager
Add and edit a production category
Each production category belongs to one baker role. For example, the Pideci category drives the pide baker's production list.
-
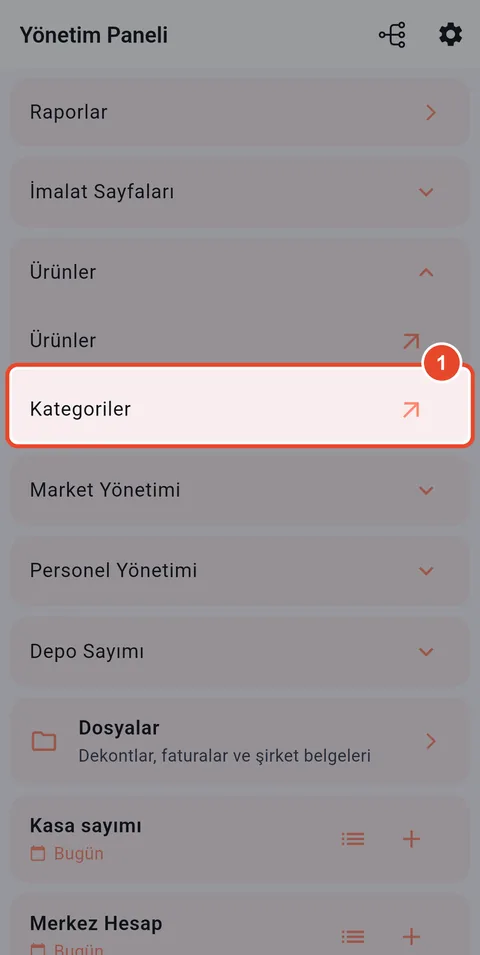
Step 1Mobile app
Open categories
In the management panel, unfold Ürünler.
- Tap Kategoriler.
-
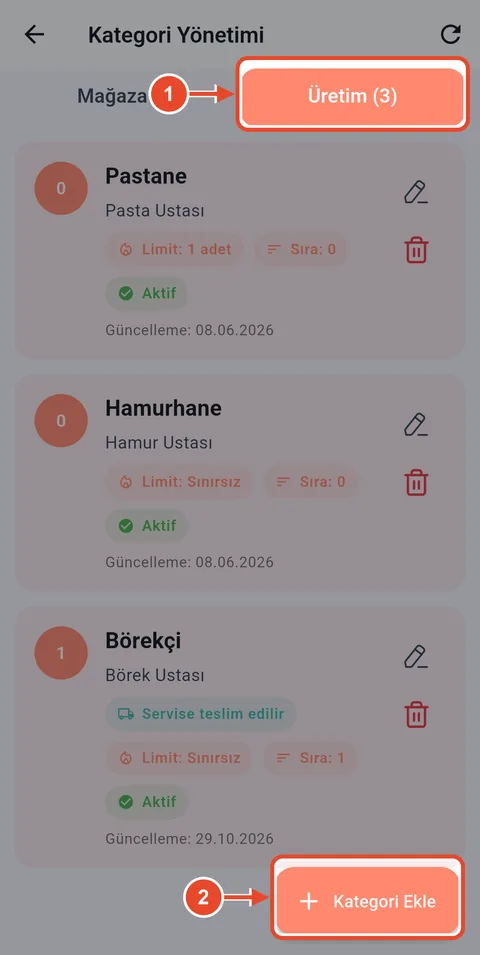
Step 2Mobile app
Production categories
The Mağaza tab holds the store categories used for stock counts; the Üretim tab holds the bakers' categories.
- Tap the Üretim tab.
- Tap Kategori Ekle (add category).
-
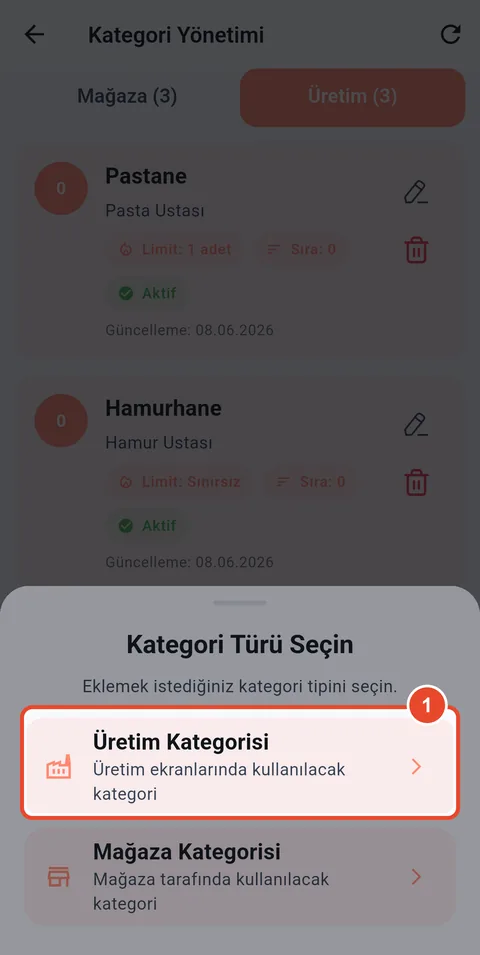
Step 3Mobile app
Choose the category type
- Choose Üretim Kategorisi (production category).
-
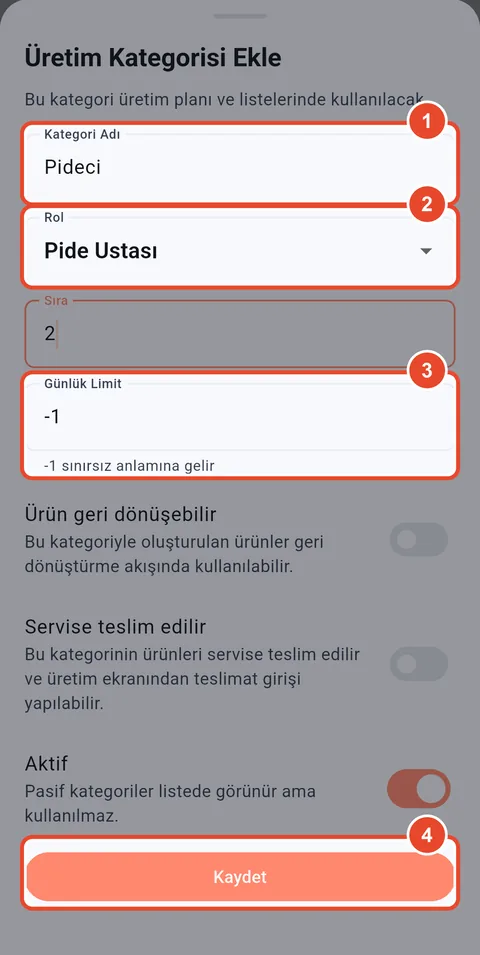
Step 4Mobile app
Enter the category details
- Category name (e.g. Pideci).
- The baker who fills this list (e.g. Pide Ustası).
- How many production lists can be opened per day. -1 means unlimited.
- Tap Kaydet.
-
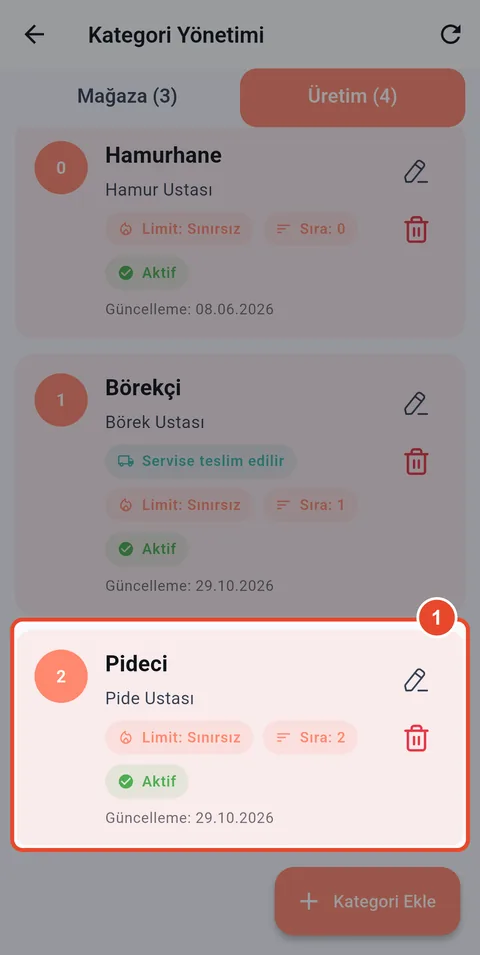
Step 5Mobile app
Category added
The new category appears at the end of the list. You can now add products to it.
- The new category.
-
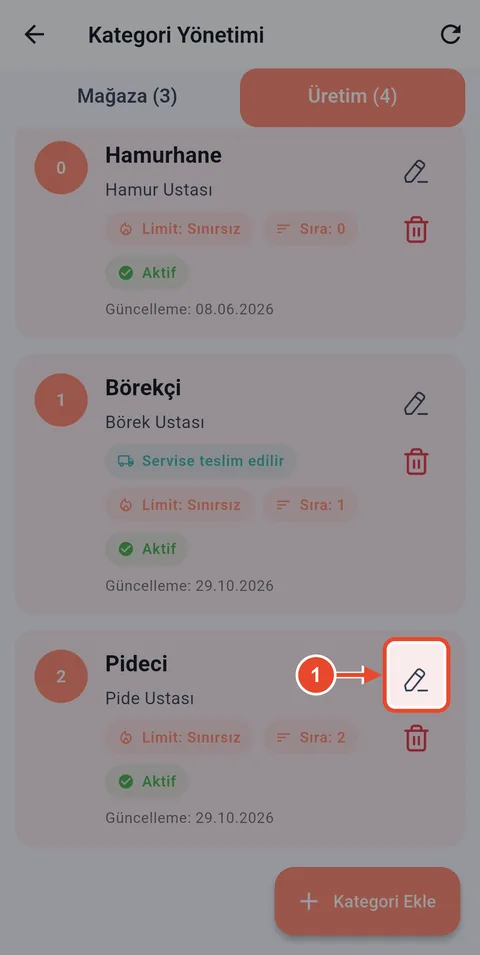
Step 6Mobile app
Edit the category
Edit a category to change its name, baker or daily limit.
- Tap the pencil.
-
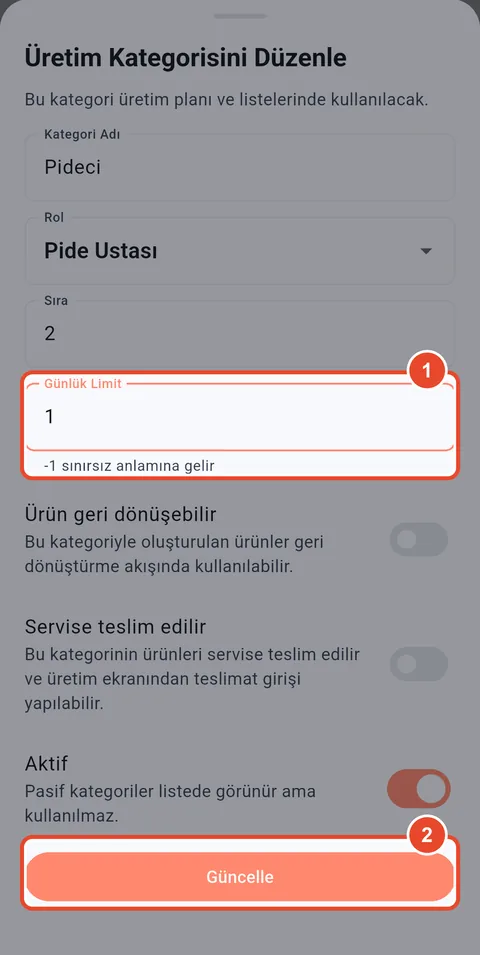
Step 7Mobile app
Save the change
In the example the limit is set to 1 so the pide list is opened once a day.
- Type the new value.
- Tap Güncelle (Update).
Branch manager
Add a product and update its price
Products are defined with a price, a unit and a bread equivalent. When a price changes, reports for past days keep the old price.
-
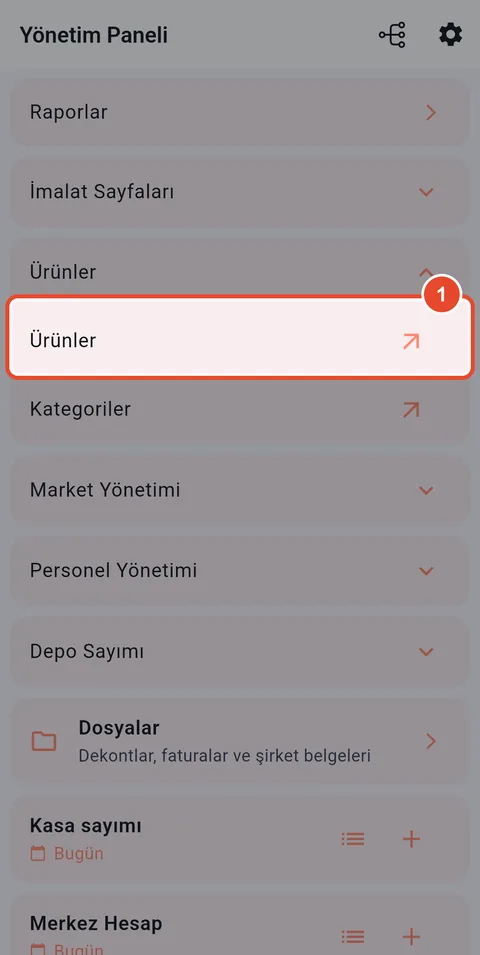
Step 1Mobile app
Open products
- Under Ürünler, tap Ürünler.
-
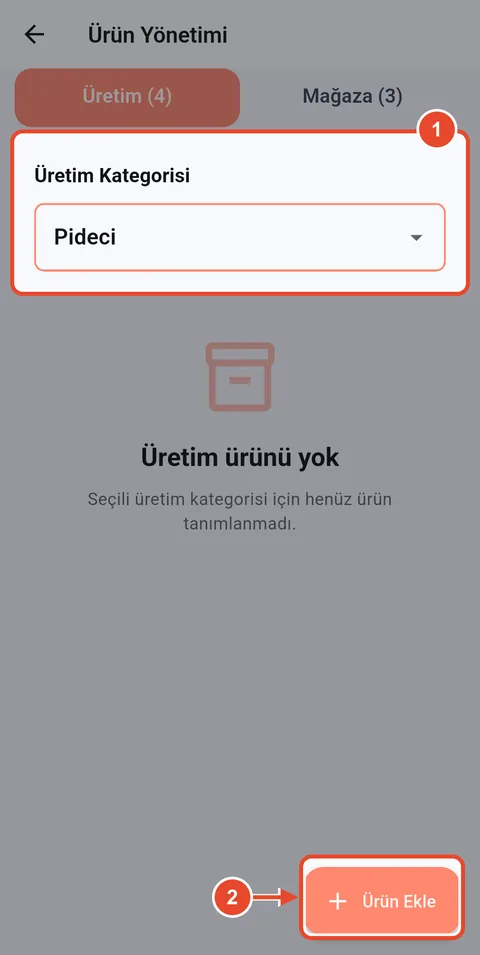
Step 2Mobile app
Choose the category
- Pick the category for the product.
- Tap Ürün Ekle (add product).
-
Step 3Mobile app
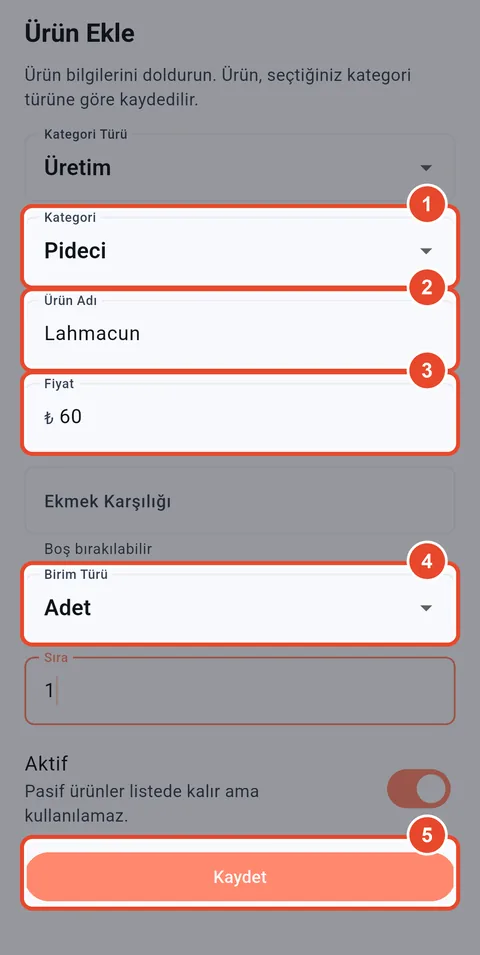
Enter the product details
The bread equivalent says how many standard loaves of dough a product uses; the bread balance is calculated from it. Leave it empty for non-bread items.
- Category.
- Product name.
- Selling price.
- Unit: piece, kg, litre…
- Tap Kaydet.
-
Step 4Mobile app
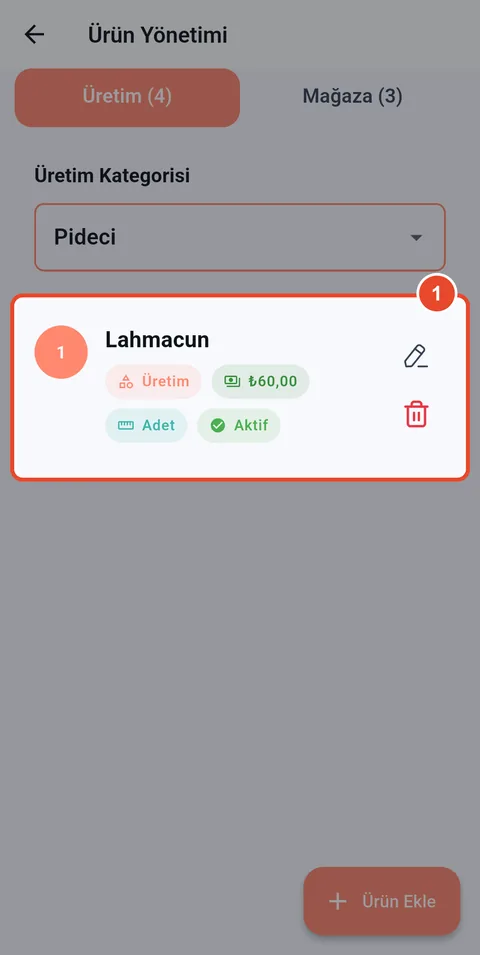
Product added
- The new product with its price and unit.
-
Step 5Mobile app
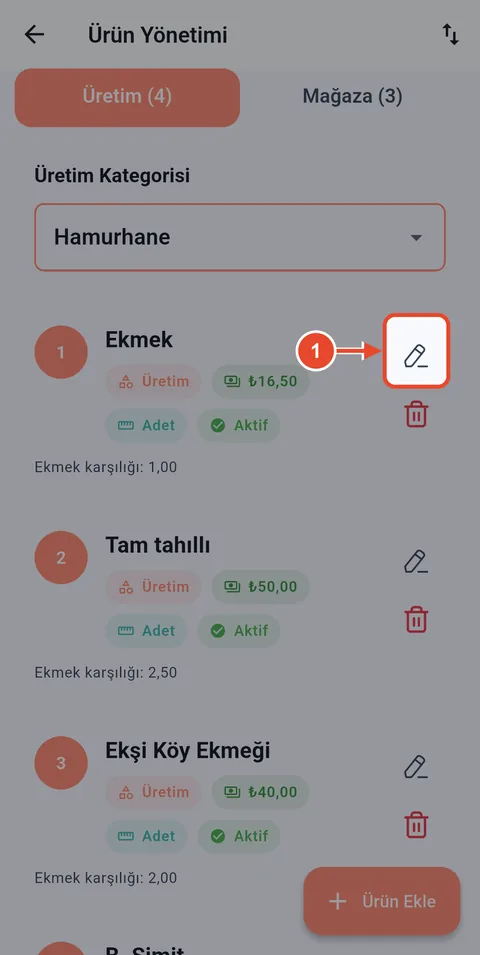
Update the price
When prices go up, edit the product and change its price.
- Tap the pencil next to the product.
-
Step 6Mobile app
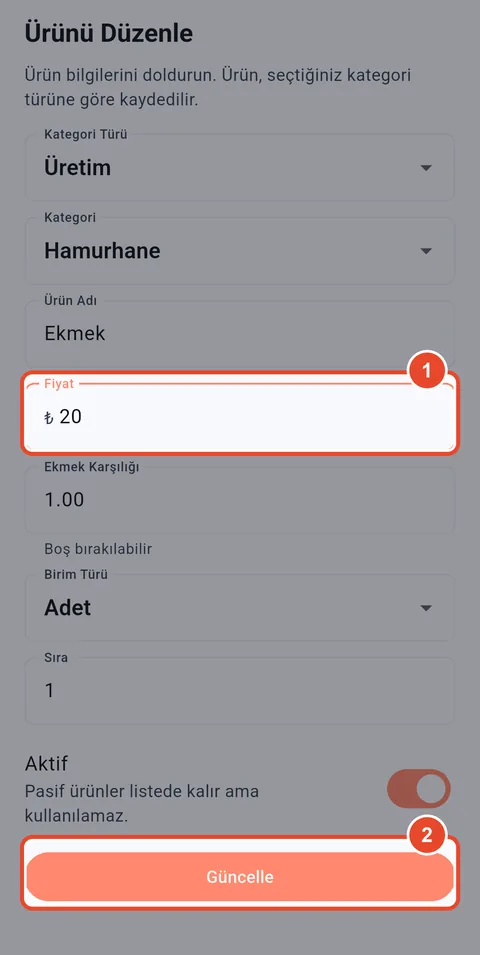
Type the new price
- New price.
- Tap Güncelle.
-
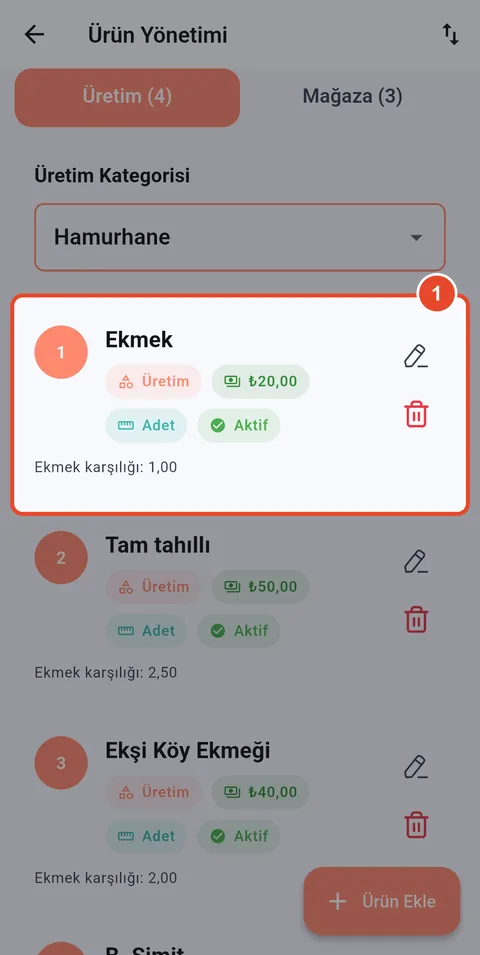
Step 7Mobile app
Price updated
From now on production and reports use the new price.
- The current price.
Branch manager
Create app accounts for staff
Create a user for everyone who signs in to the app. The role you choose decides which screen they see.
-
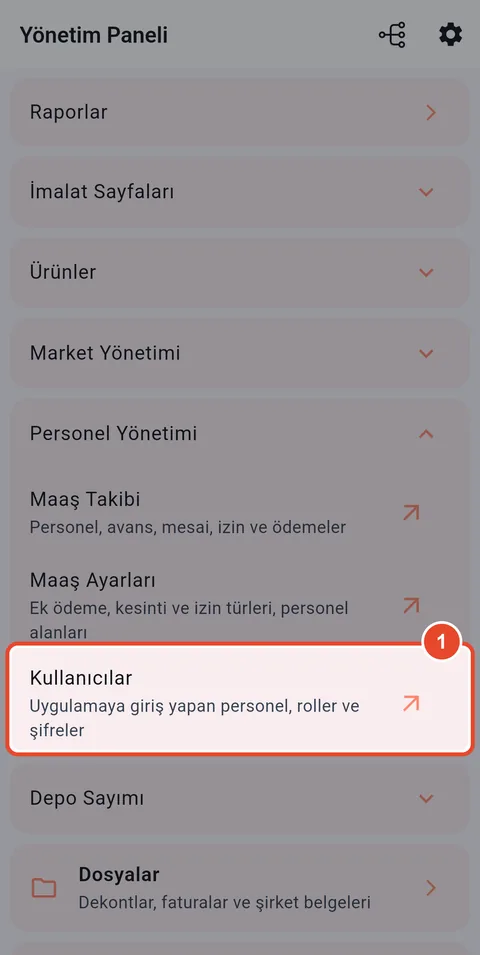
Step 1Mobile app
Open users
- Under Personel Yönetimi, tap Kullanıcılar.
-
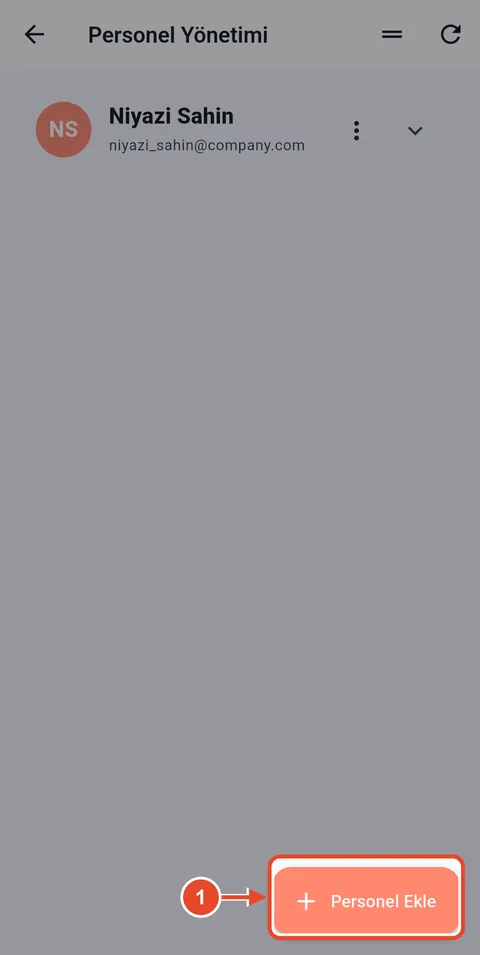
Step 2Mobile app
Add a staff member
- Tap Personel Ekle.
-
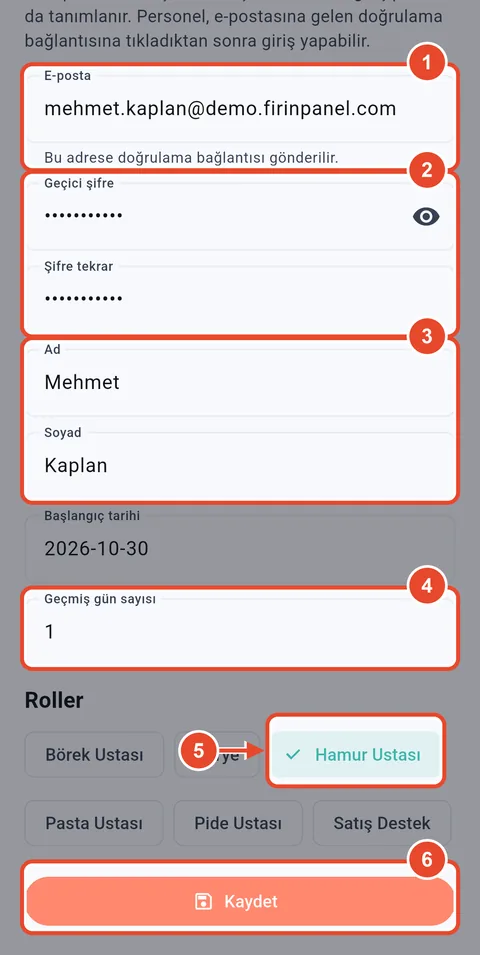
Step 3Mobile app
Enter details and role
History days set how far back the person can see records: 0 is today only, 1 includes yesterday, -1 is unlimited.
- Staff e-mail. The verification link goes here.
- Temporary password, twice.
- First and last name.
- History days (Geçmiş gün sayısı).
- Role: bread, pastry, börek or pide baker, Kurye (delivery driver) or Satış Destek (counter).
- Tap Kaydet.
-
Step 4Mobile app
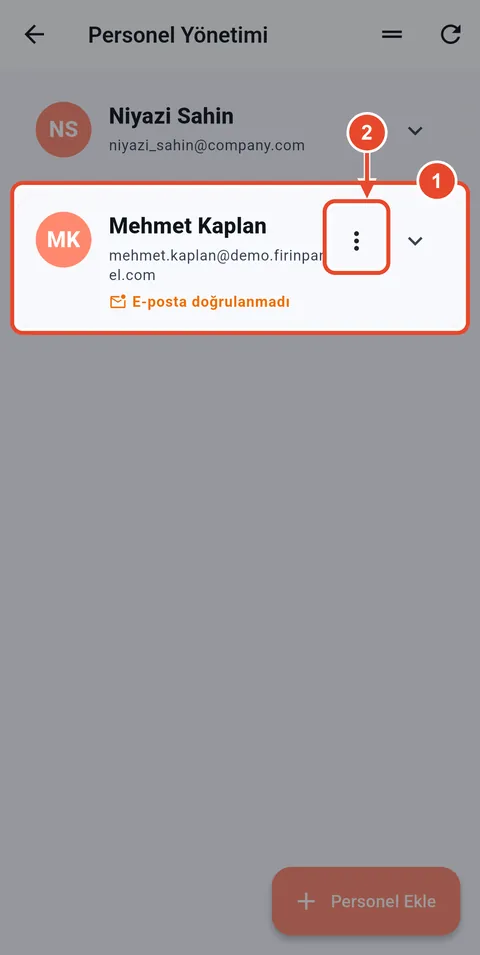
Account created
The staff member can sign in after clicking the link in their e-mail.
- The new user. "E-posta doğrulanmadı" means verification is pending.
- Tap the menu for more actions.
-
Step 5Mobile app
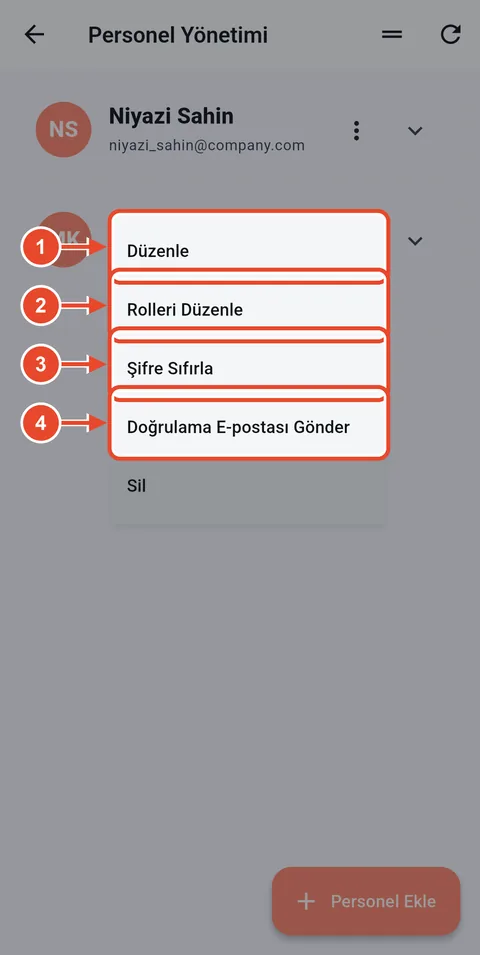
Manage the user
- Edit name, e-mail and other details.
- Change the role.
- Reset the password.
- Resend the verification e-mail.
Branch manager
Add and edit markets
Add the markets your delivery van supplies. Balances, collections and stale returns are tracked per market.
-
Step 1Mobile app
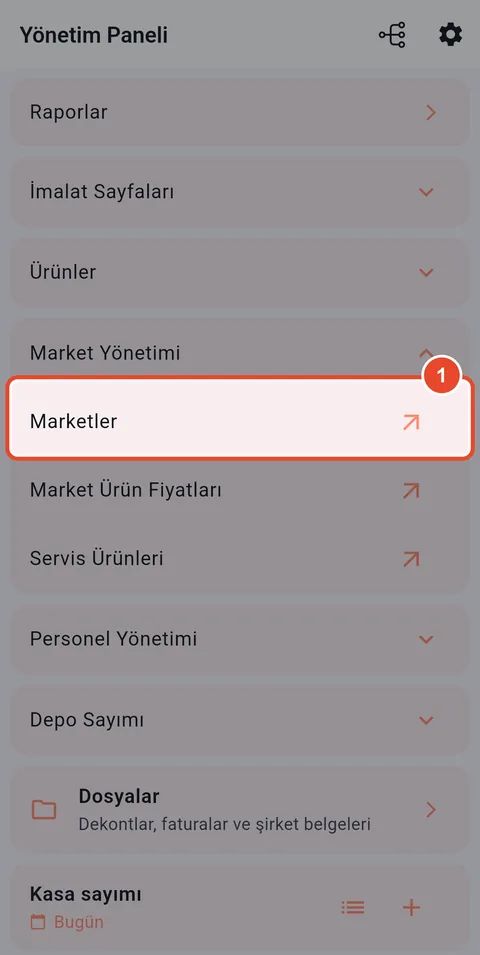
Open markets
- Under Market Yönetimi, tap Marketler.
-
Step 2Mobile app
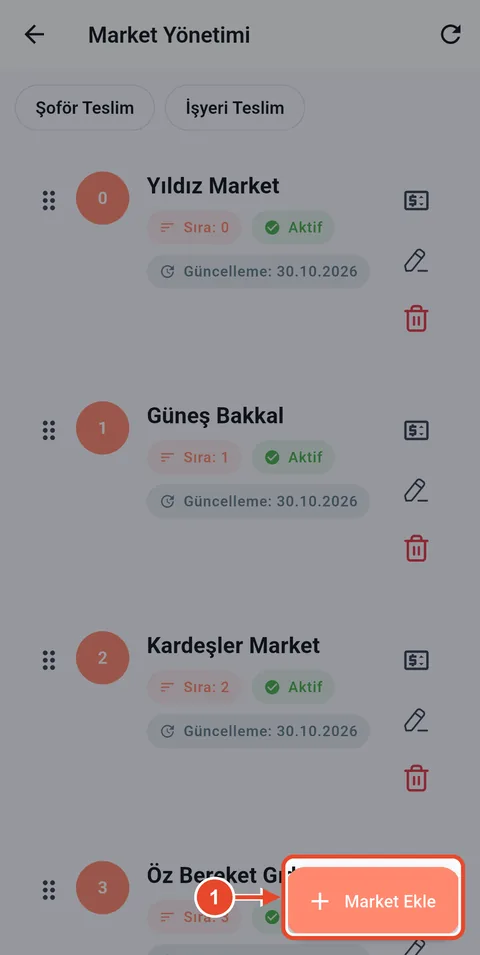
Add a market
The tabs at the top group markets by how they receive goods.
- Tap Market Ekle.
-
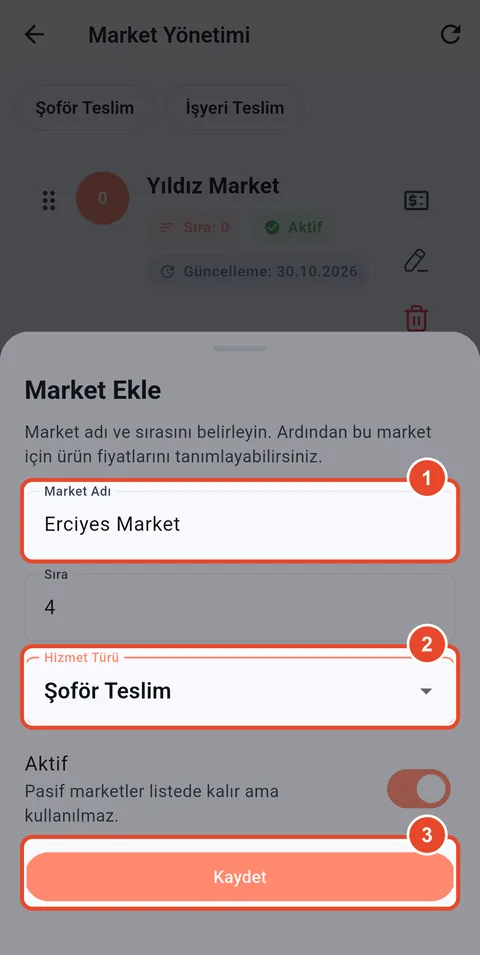
Step 3Mobile app
Enter the market details
- Market name.
- Delivery: Şoför Teslim (the driver delivers) or İşyeri Teslim (the market collects from the bakery).
- Tap Kaydet.
-
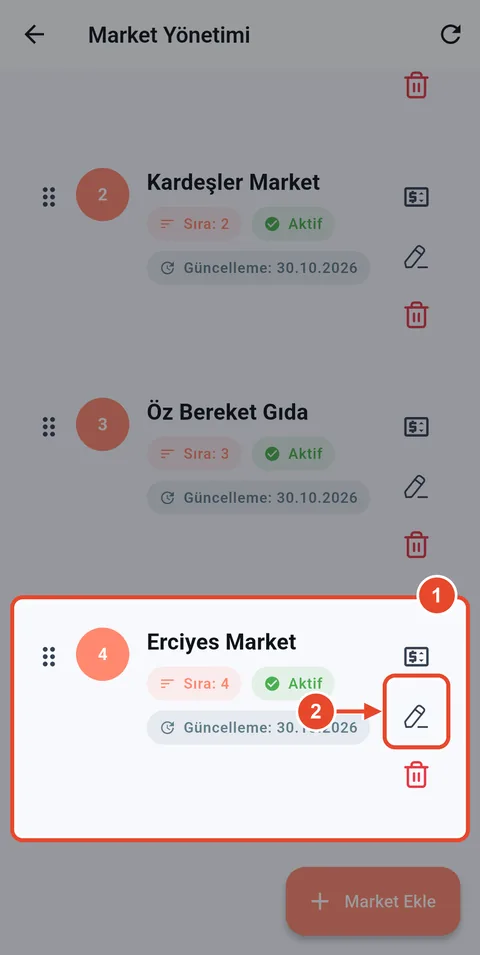
Step 4Mobile app
Market added
- The new market.
- Tap the pencil to edit it.
-
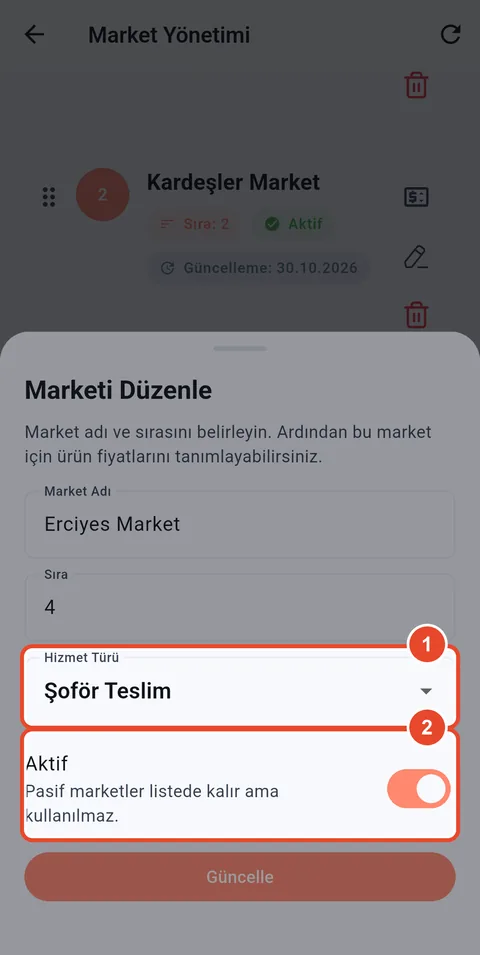
Step 5Mobile app
Edit the market
Instead of deleting a market you no longer supply, set it inactive; its history is kept.
- Change the delivery type.
- Set the market active or inactive.
Branch manager
Define delivery products
Choose which products go out to markets. Market prices are attached to these records.
-
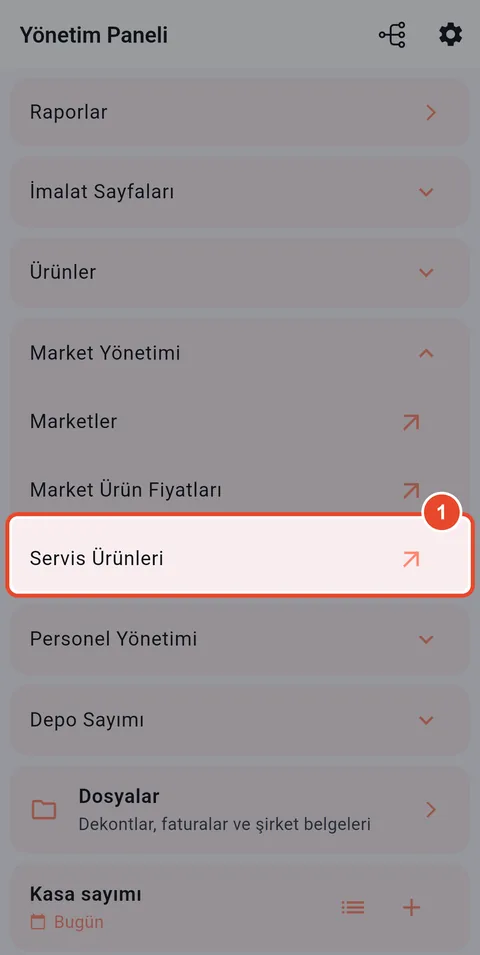
Step 1Mobile app
Open delivery products
- Under Market Yönetimi, tap Servis Ürünleri.
-
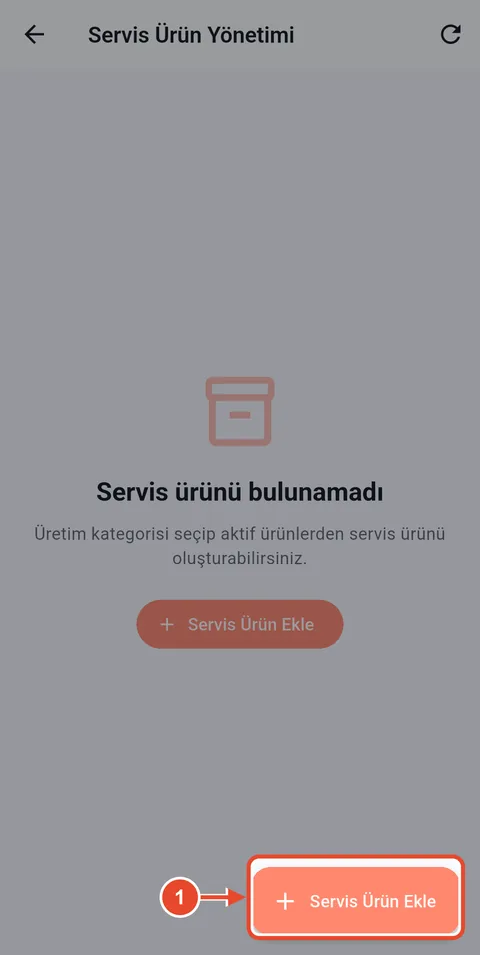
Step 2Mobile app
Add a delivery product
- Tap Servis Ürün Ekle.
-
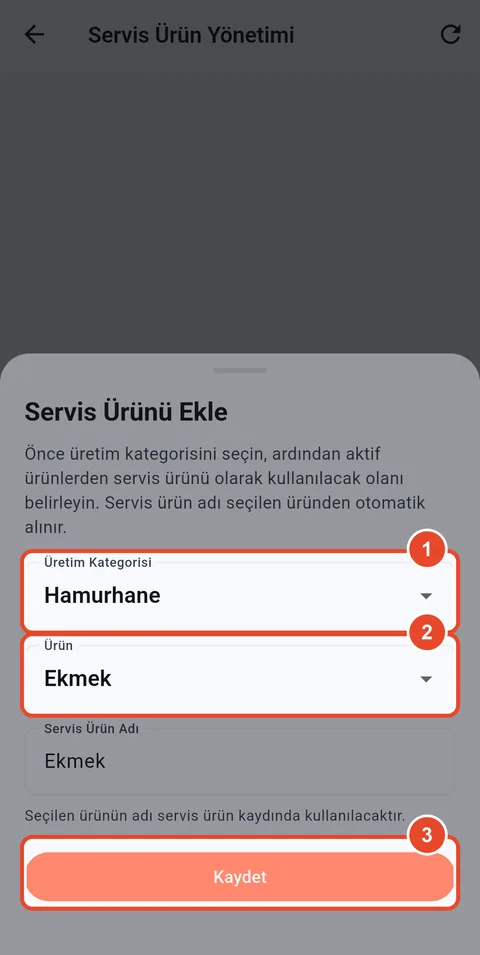
Step 3Mobile app
Pick the product
The delivery product takes its name from the product you pick.
- Choose the production category.
- Choose the product that goes out for delivery.
- Tap Kaydet.
-
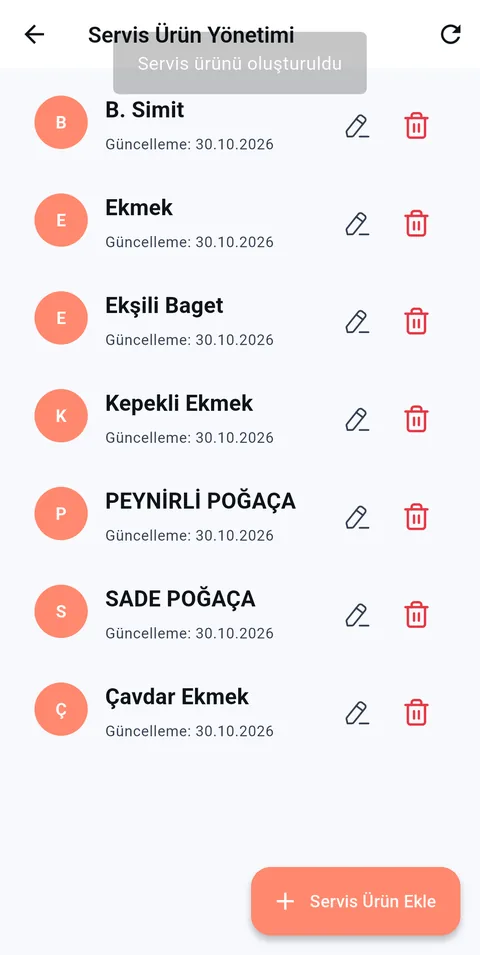
Step 4Mobile app
Delivery product list
Add every product that goes to markets the same way: bread, simit, poğaça…
Branch manager
Set prices per market
Set the price of each delivery product separately for every market. Delivery sheets and collection amounts use these prices.
-
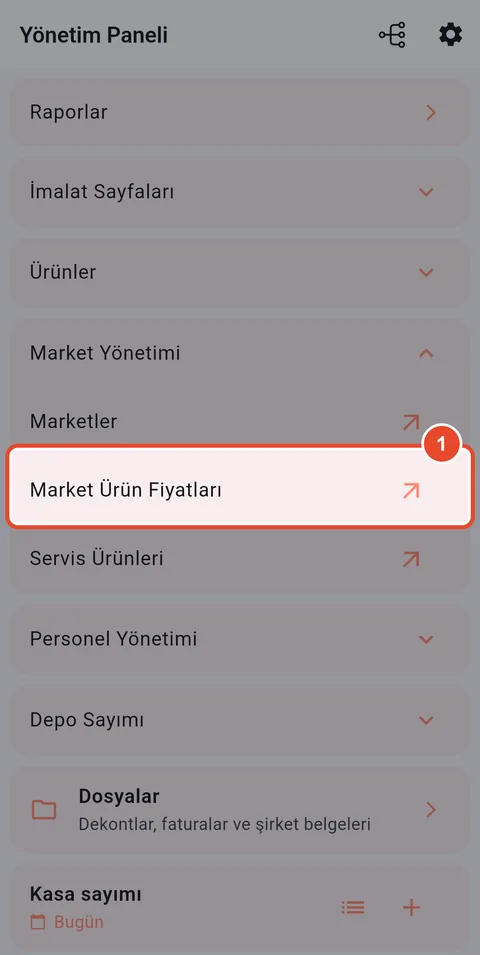
Step 1Mobile app
Open market prices
- Tap Market Ürün Fiyatları.
-
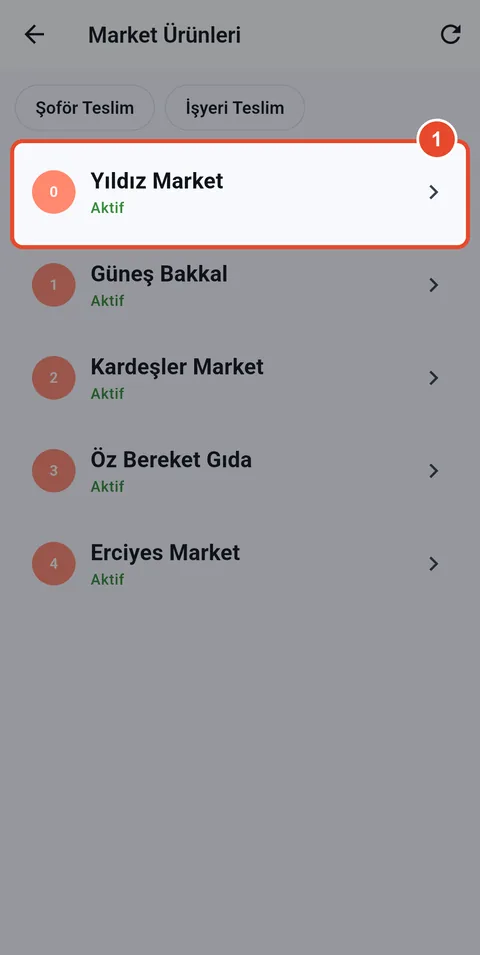
Step 2Mobile app
Choose the market
- Tap the market you want to price.
-
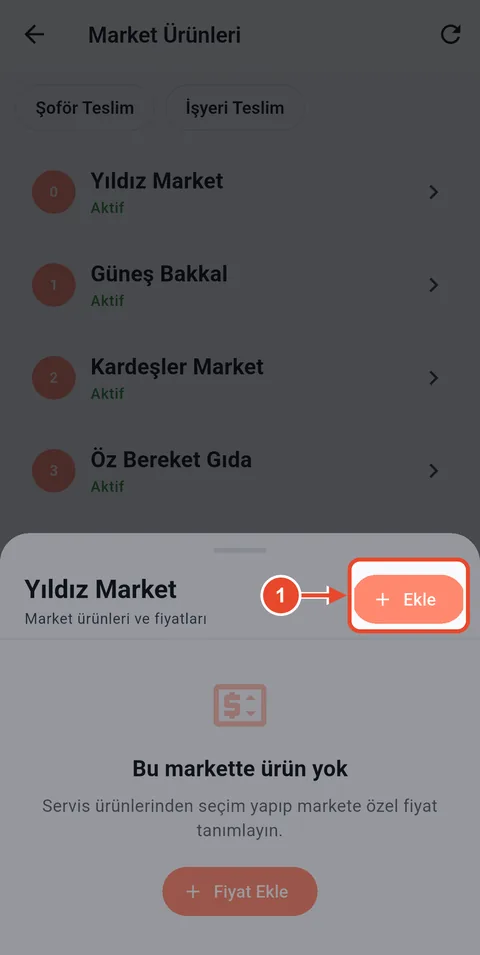
Step 3Mobile app
Add a price
- Tap Ekle.
-
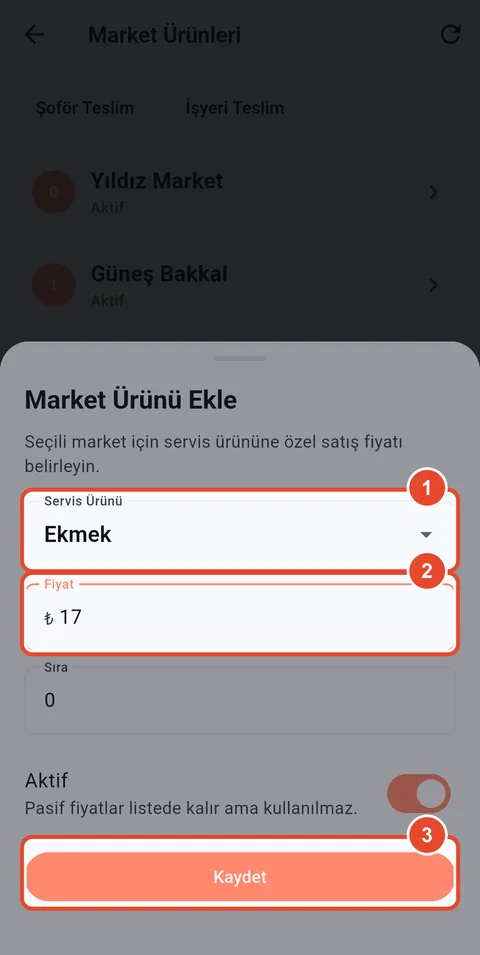
Step 4Mobile app
Enter product and price
- Choose the delivery product.
- Type the price this market pays.
- Tap Kaydet.
-
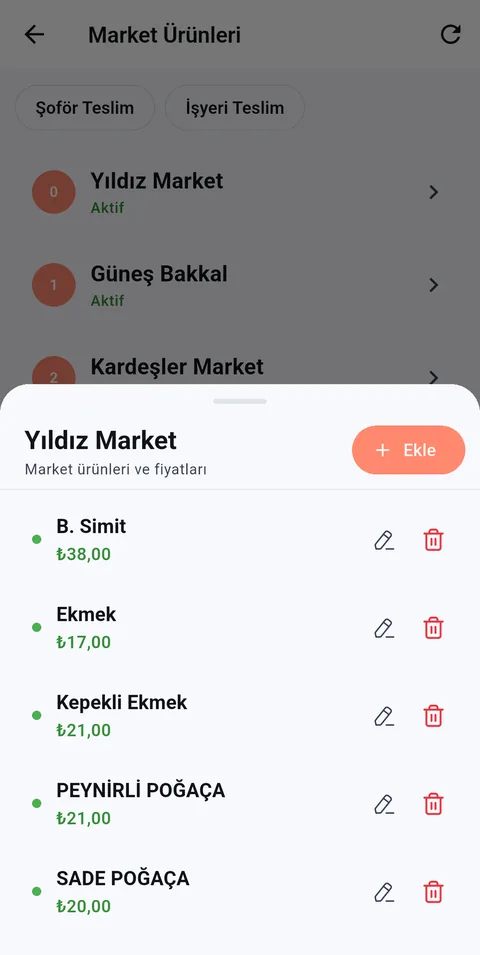
Step 5Mobile app
The market's price list
Prices appear in the market's list. Change them with the pencil or remove them with the bin.
Branch manager
Payroll: staff, pay and advances
Track each employee's pay, advances, overtime and leave; the app works out what is due at the end of the period.
-
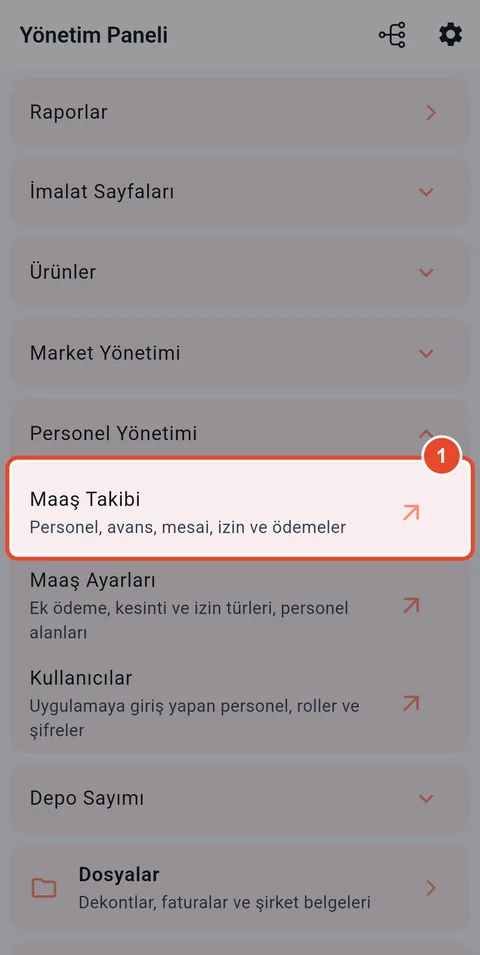
Step 1Mobile app
Open payroll
- Under Personel Yönetimi, tap Maaş Takibi.
-
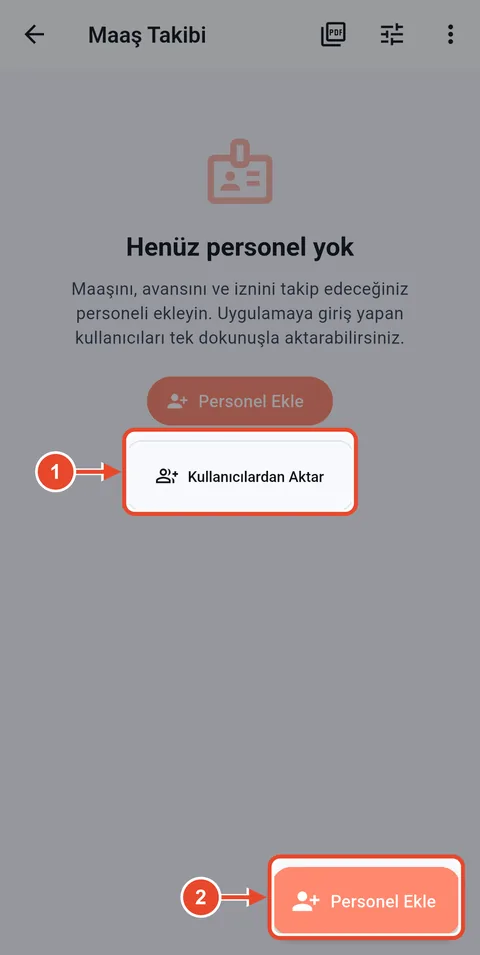
Step 2Mobile app
Add employees
Import all app users at once, or add staff who do not use the app (e.g. cleaners) by hand.
- Kullanıcılardan Aktar imports app users.
- Personel Ekle adds a single person.
-
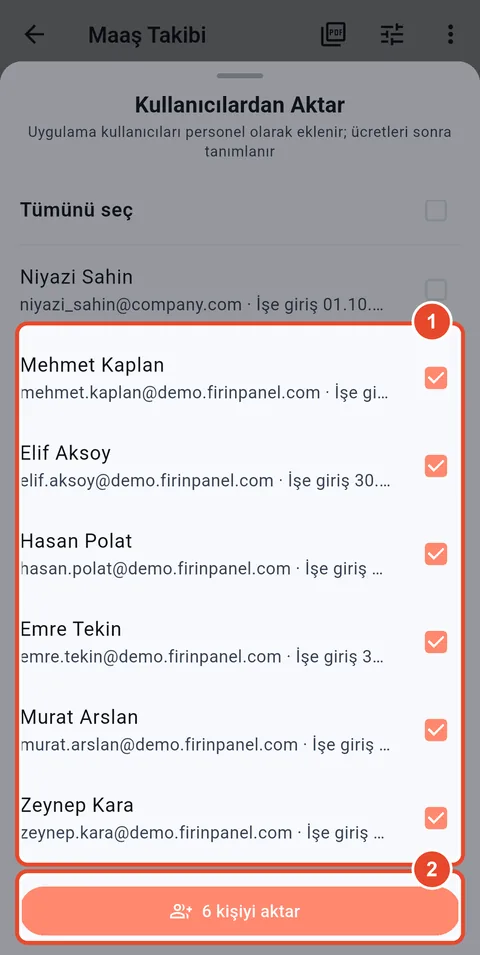
Step 3Mobile app
Choose who to import
- Tick the people whose pay you will track.
- Tap Aktar (import).
-
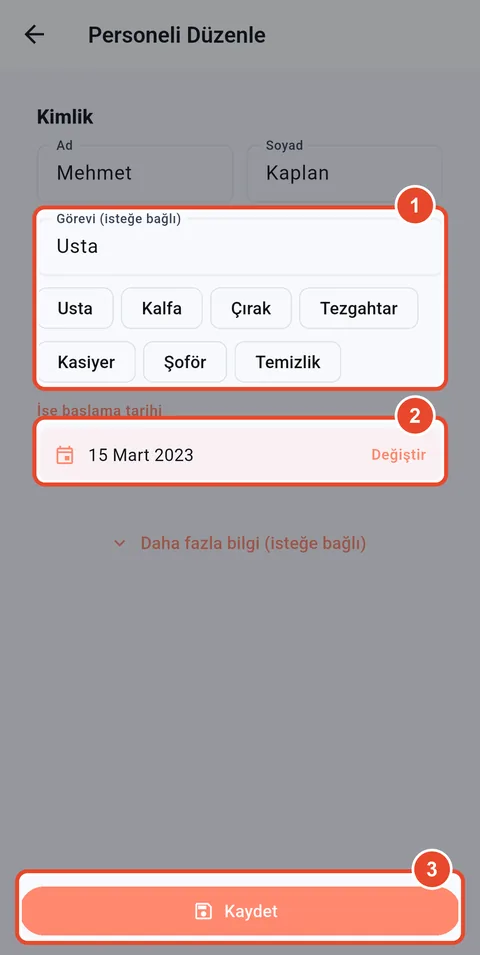
Step 4Mobile app
Position and start date
On the employee's page use the pencil at the top right. The start date drives seniority and annual leave.
- Choose the position: master, journeyman, apprentice, counter staff…
- Enter the start date.
- Tap Kaydet.
-
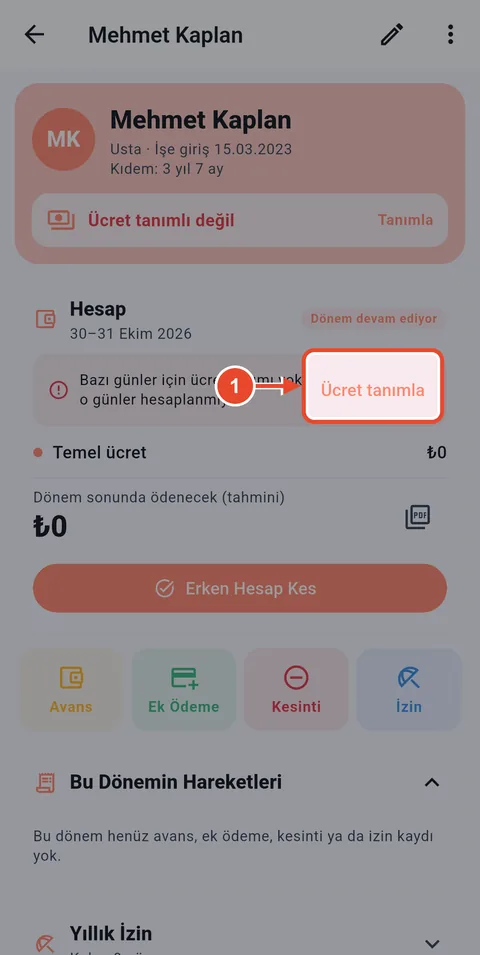
Step 5Mobile app
Define pay
Days without a defined pay are not counted.
- Tap Ücret tanımla (define pay).
-
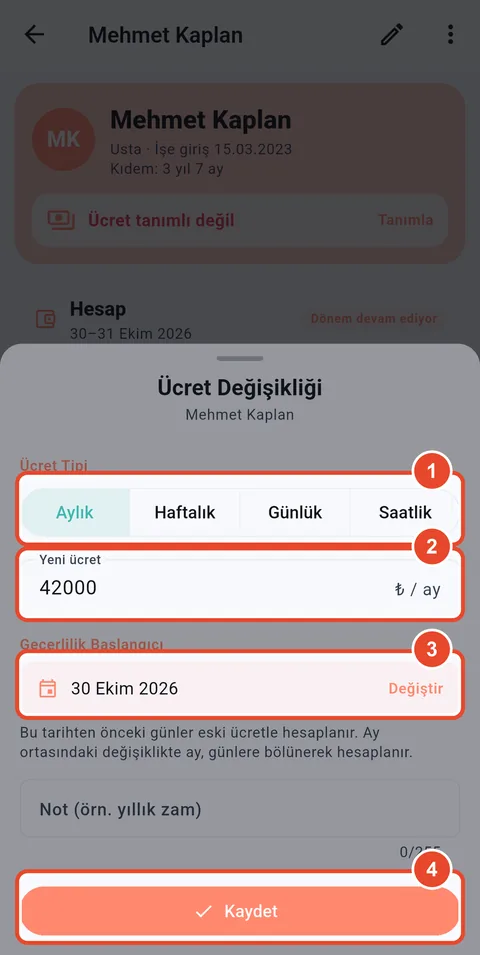
Step 6Mobile app
Pay details
When you give a raise, enter the new pay with the date it takes effect; earlier days stay at the old rate.
- Pay type: monthly, weekly, daily or hourly.
- Amount.
- Effective from.
- Tap Kaydet.
-
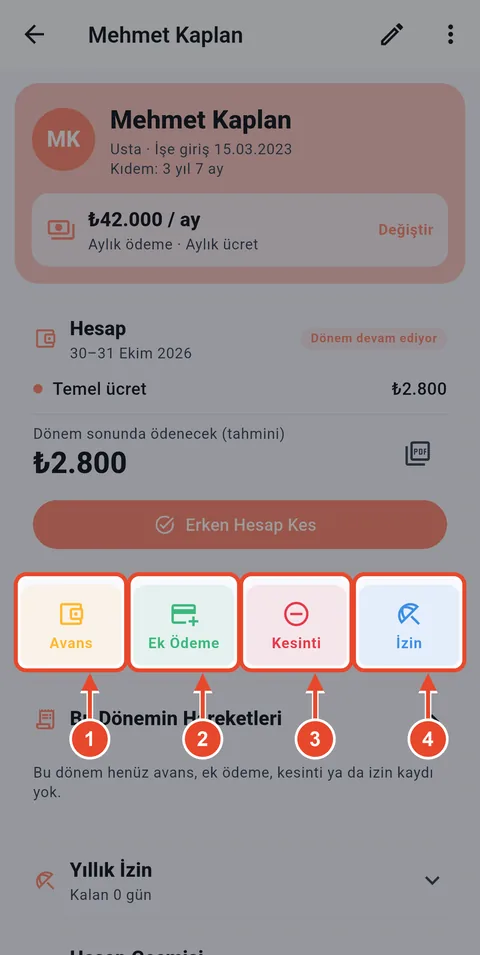
Step 7Mobile app
Advances, extras, deductions and leave
Record everything that happens during the period with these buttons.
- Give an advance.
- Add an extra payment (bonus, overtime).
- Make a deduction.
- Record leave.
-
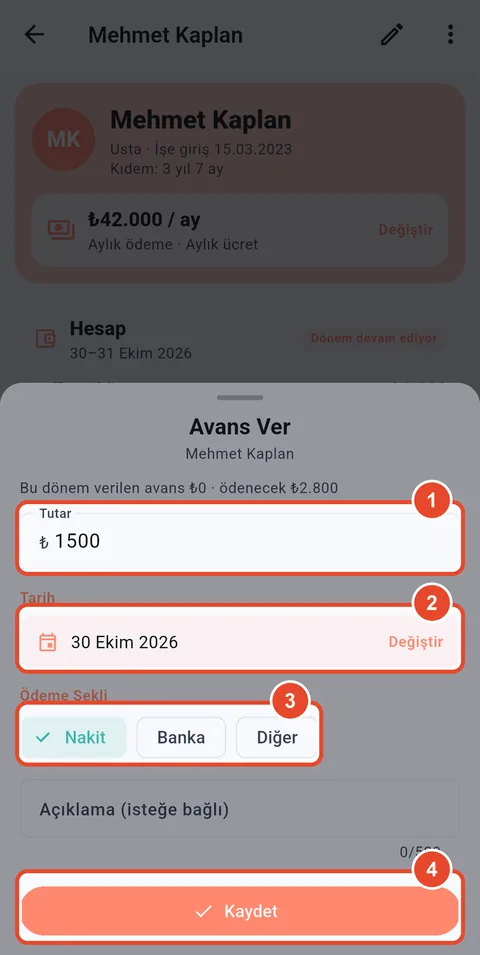
Step 8Mobile app
Give an advance
- Advance amount.
- Date.
- Payment method: cash, bank or other.
- Tap Kaydet.
-
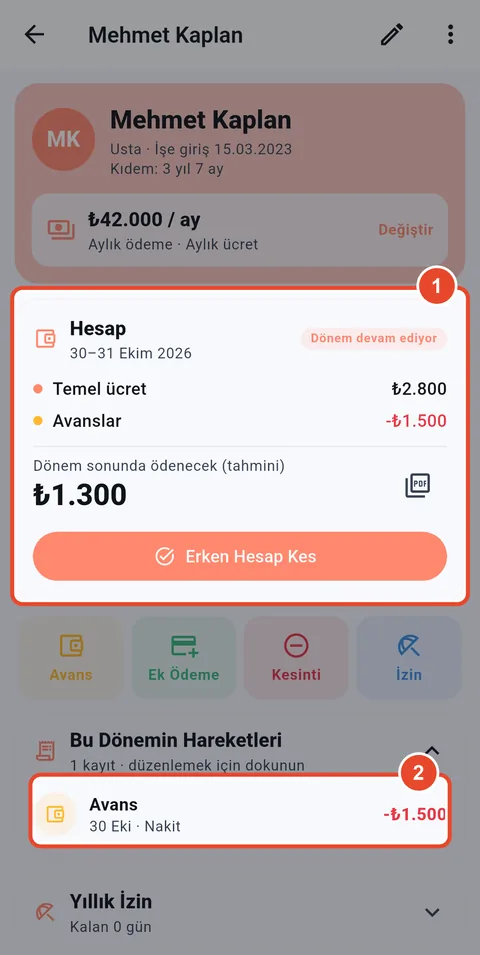
Step 9Mobile app
Account updated
The amount due at the end of the period is recalculated with the advance deducted.
- Period account: base pay, advances and amount due.
- The recorded entry. Tap it to correct it.
-
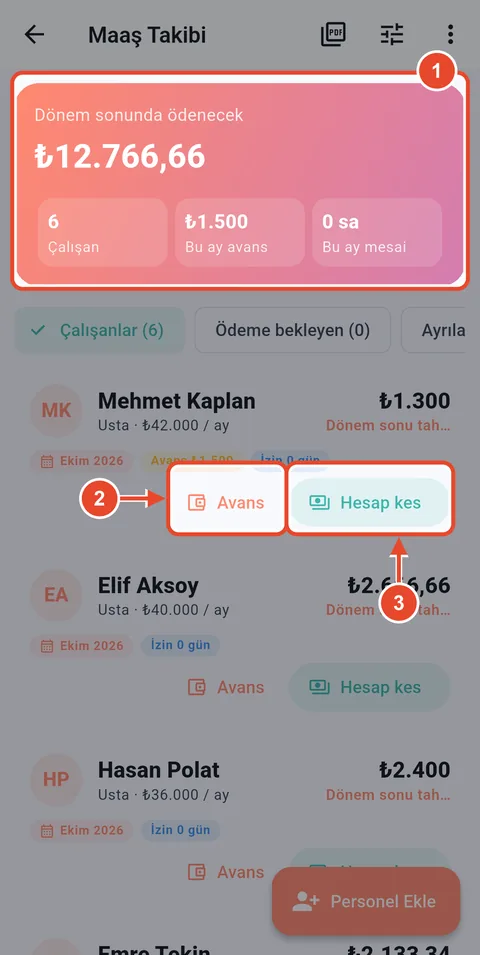
Step 10Mobile app
Summary for all staff
The payroll home screen shows the total due at the end of the period and the status of each employee.
- Total due, headcount, advances and overtime this month.
- Give an advance quickly.
- Settle the period with Hesap kes when it ends.
-
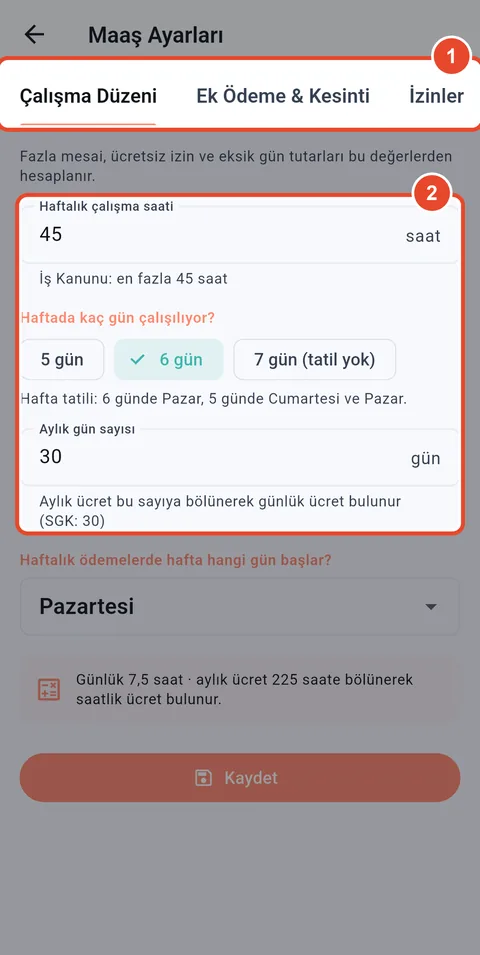
Step 11Mobile app
Payroll settings
In Maaş Ayarları define the working pattern, extra payment and deduction types, and leave types.
- Settings tabs.
- Weekly hours, working days per week and days per month. Overtime and missing days are calculated from these.
Branch manager
Cash count and head-office account
At the end of the day the counter counts the till; the manager checks it, adds the cash taken and posts the day's account to head office.
-
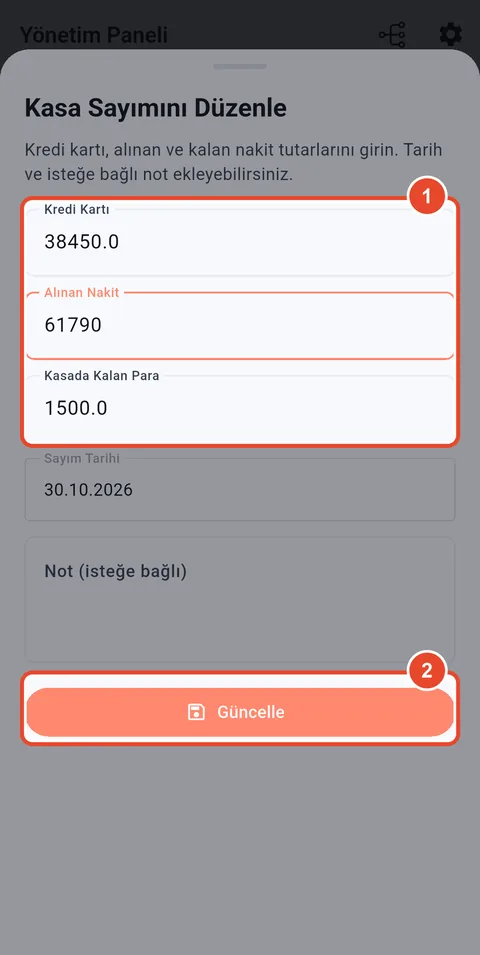
Step 1Mobile app
Check the cash count
On the panel tap the list icon on the Kasa sayımı row, then Düzenle in the record's menu.
- Card total, cash taken and cash left in the till. The manager enters the cash taken.
- Tap Güncelle.
-
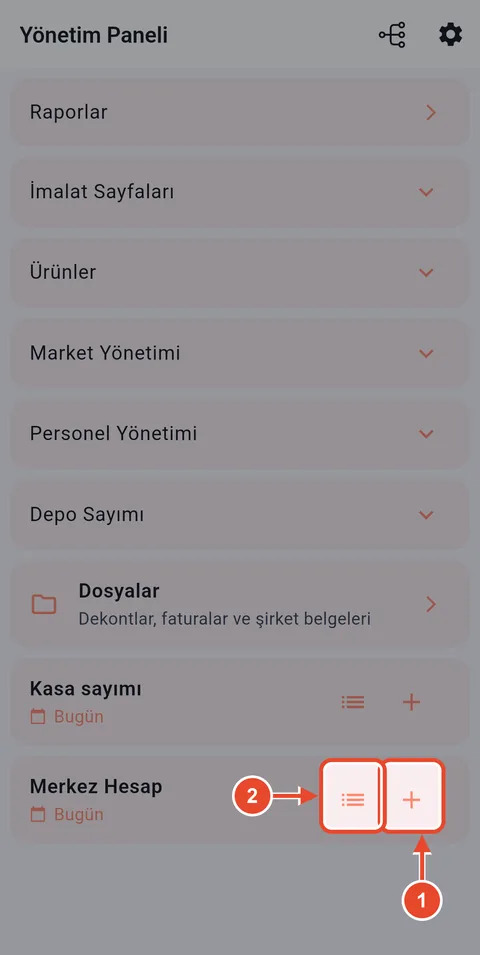
Step 2Mobile app
Open the head-office account
- Tap + for a new entry.
- Tap the list icon to see entries.
-
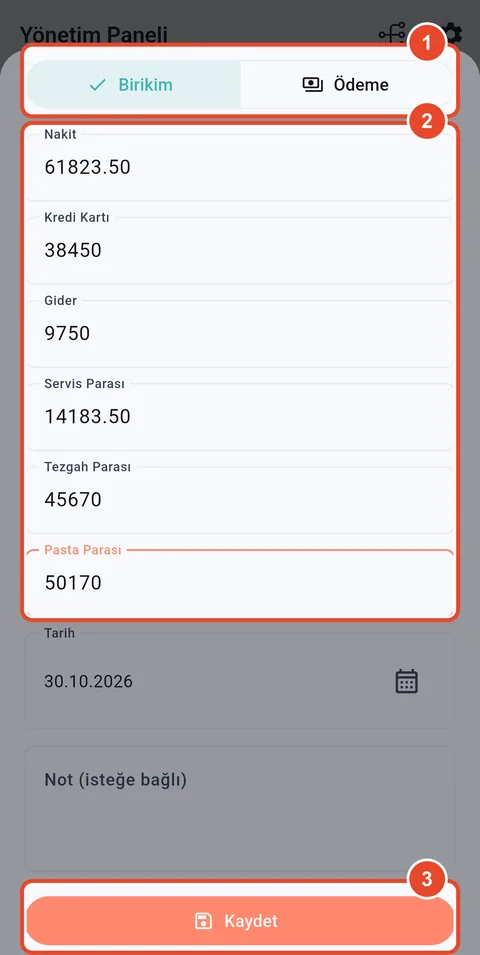
Step 3Mobile app
Enter the day's account
Choose Birikim for the daily account and Ödeme when you send money to head office.
- Birikim (daily account) or Ödeme (payment).
- Cash, card, expenses, delivery, counter and pastry amounts.
- Tap Kaydet.
-
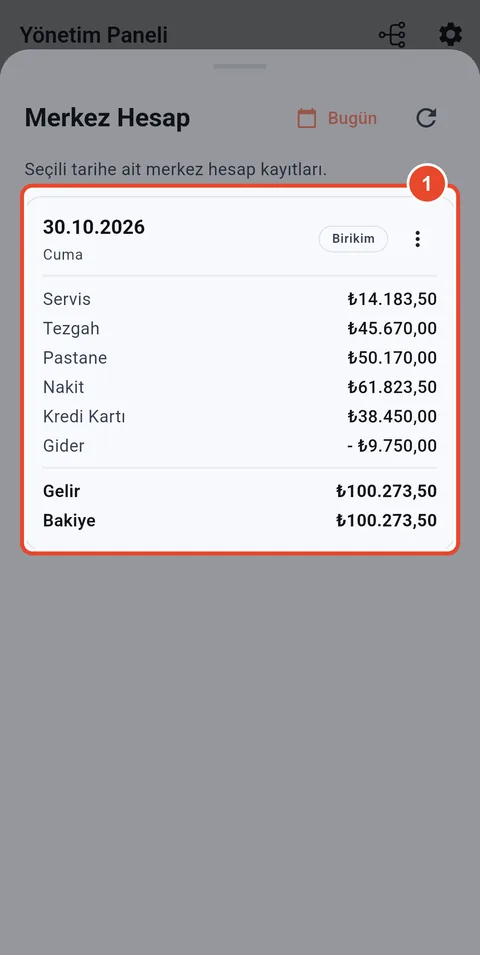
Step 4Mobile app
Entry list
The day's income is added to the running balance.
- The day's head-office entry and balance.
Branch manager
Get and share PDF reports
General account, production, market and cash reports are produced as PDF with one tap.
-
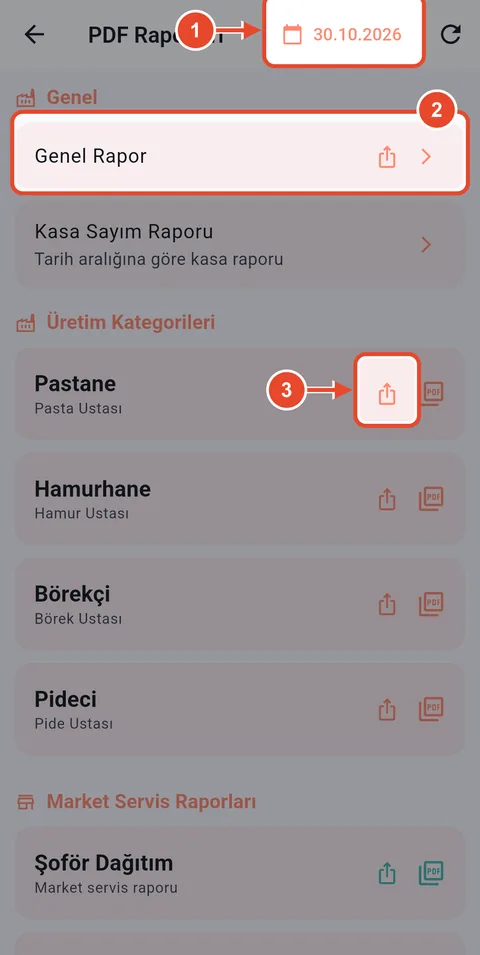
Step 1Mobile app
Reports
In the management panel tap Raporlar.
- Choose the report date.
- Genel Rapor: the day's revenue, expenses and bread balance.
- Use the share icon to send a date range by WhatsApp or e-mail.
-
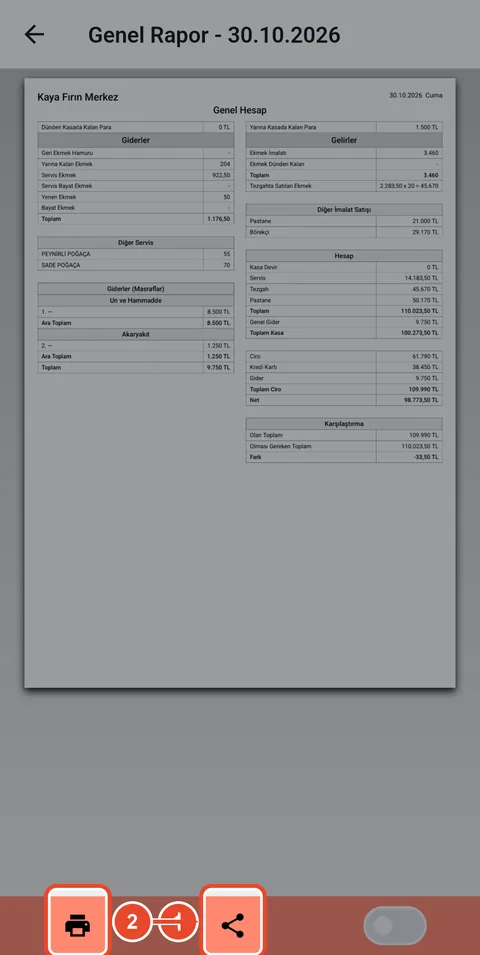
Step 2Mobile app
Print or share
The general report shows the whole day on one page: bread balance, other production sales, expenses and the cash difference.
- Print.
- Share.
-
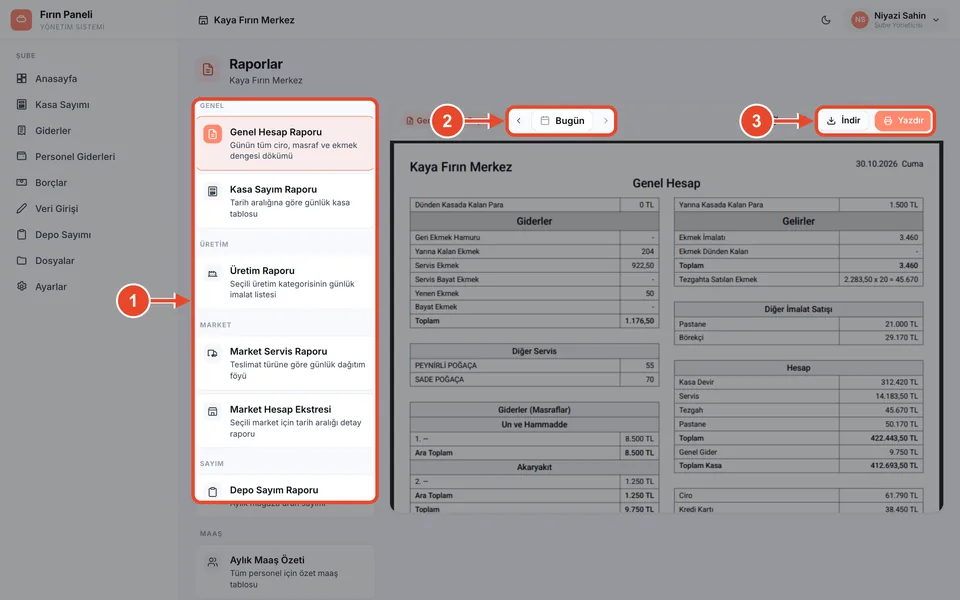
Step 3Web panel
Reports on the web panel
The same reports are on the web panel's Raporlar page, where you can read them on a big screen and download them.
- Choose the report.
- Change the date.
- Download as PDF or print.
Branch manager
Business settings
Values like the bread price and daily consumption are the basis of the general account.
-
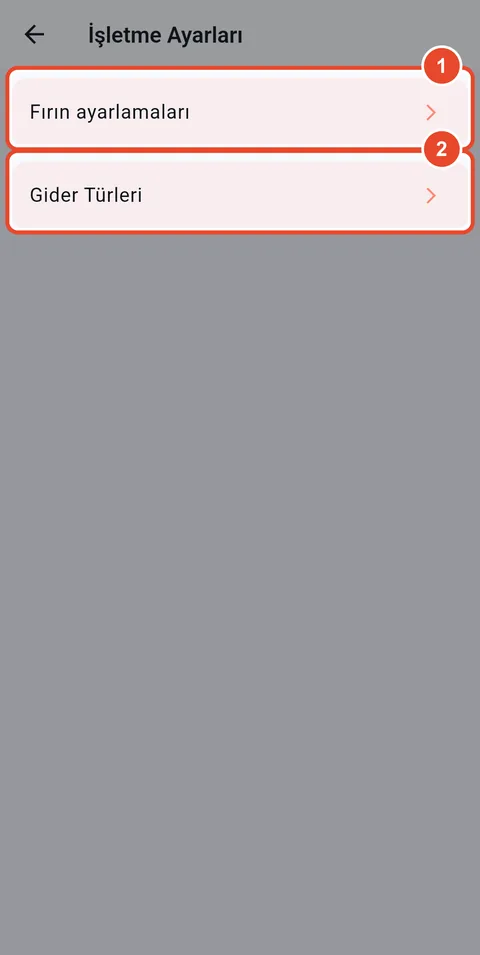
Step 1Mobile app
Business settings
Tap the branch icon at the top right of the management panel.
- Fırın ayarlamaları: prices and daily consumption.
- Gider türleri: expense headings such as rent, electricity and flour.
-
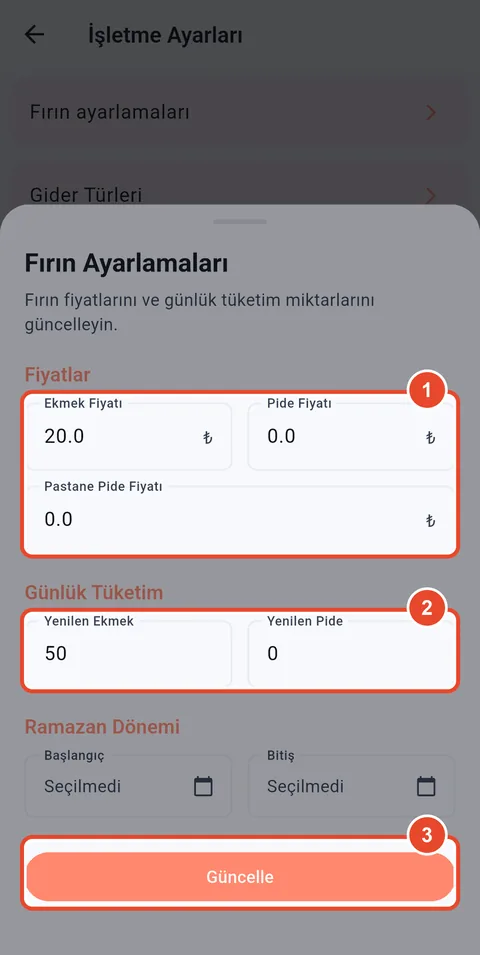
Step 2Mobile app
Bakery settings
- Bread, pide and pastry-pide prices.
- Bread and pide eaten by staff each day; deducted from the bread balance.
- Tap Güncelle.
Branch manager
Monthly stock count
At the end of the month count store items such as drinks, deli products and raw materials.
-
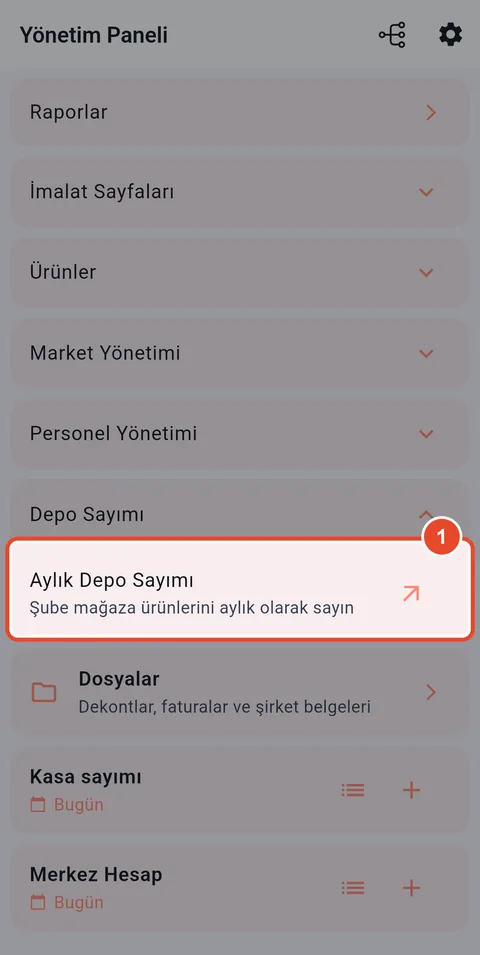
Step 1Mobile app
Open the stock count
- Under Depo Sayımı, tap Aylık Depo Sayımı.
-
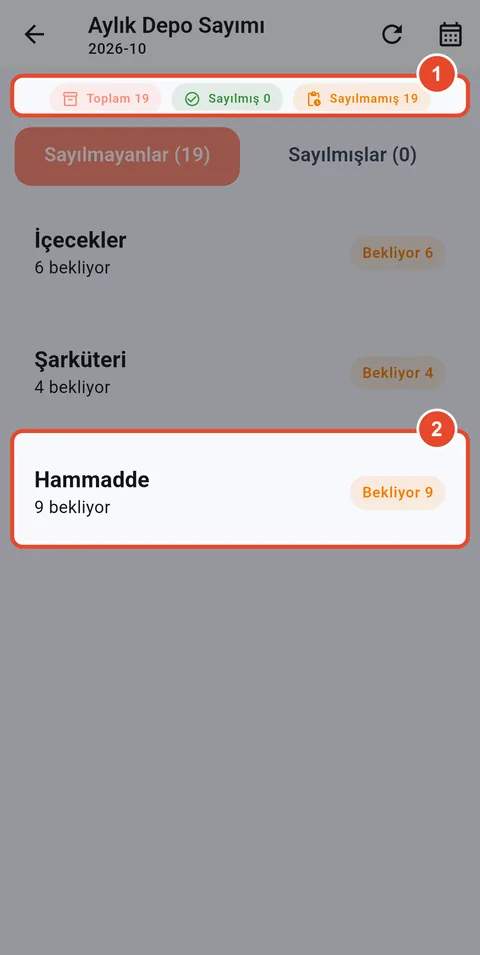
Step 2Mobile app
Items to count
Items are grouped by store category.
- Total, counted and not yet counted.
- Open a category.
-
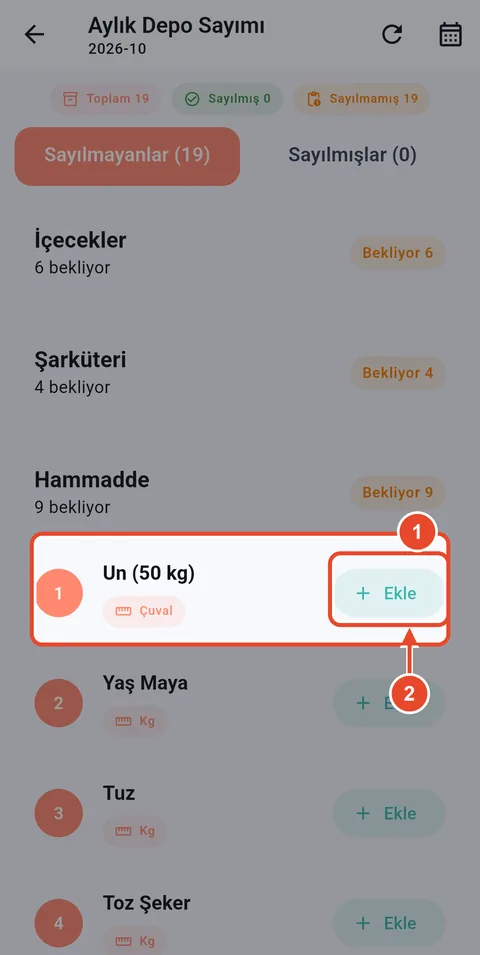
Step 3Mobile app
Count an item
- The item to count.
- Tap Ekle.
-
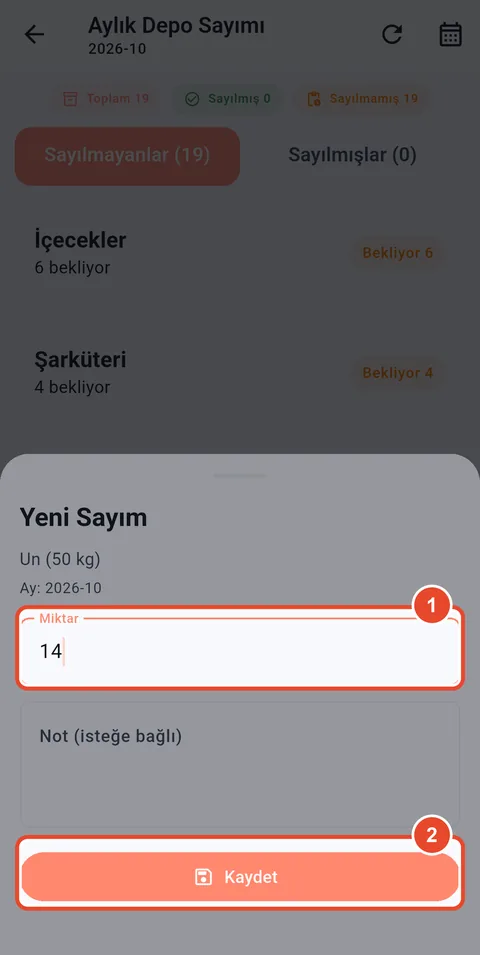
Step 4Mobile app
Enter the quantity
Counted items move to the Sayılmışlar (counted) tab.
- The quantity you counted.
- Tap Kaydet.
Branch manager
The day at a glance on the web panel
From a computer, open panel.firinpanel.com to see the branch's daily figures and fill in missing records.
-
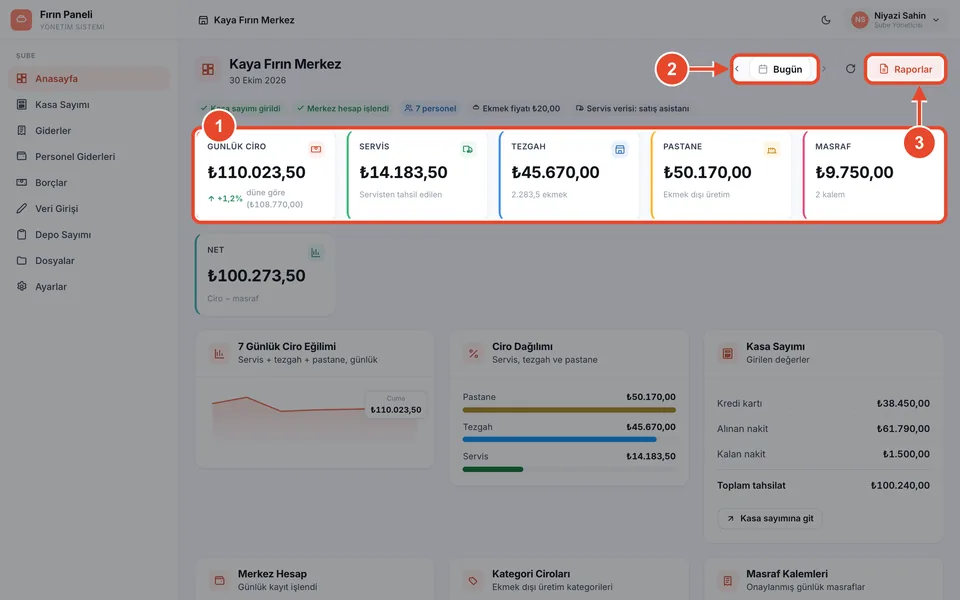
Step 1Web panel
Home
Cards for revenue, delivery, counter, pastry and expenses, plus a 7-day revenue chart.
- Today's figures and the change versus yesterday.
- Change the date to see another day.
- Open the day's reports.
-
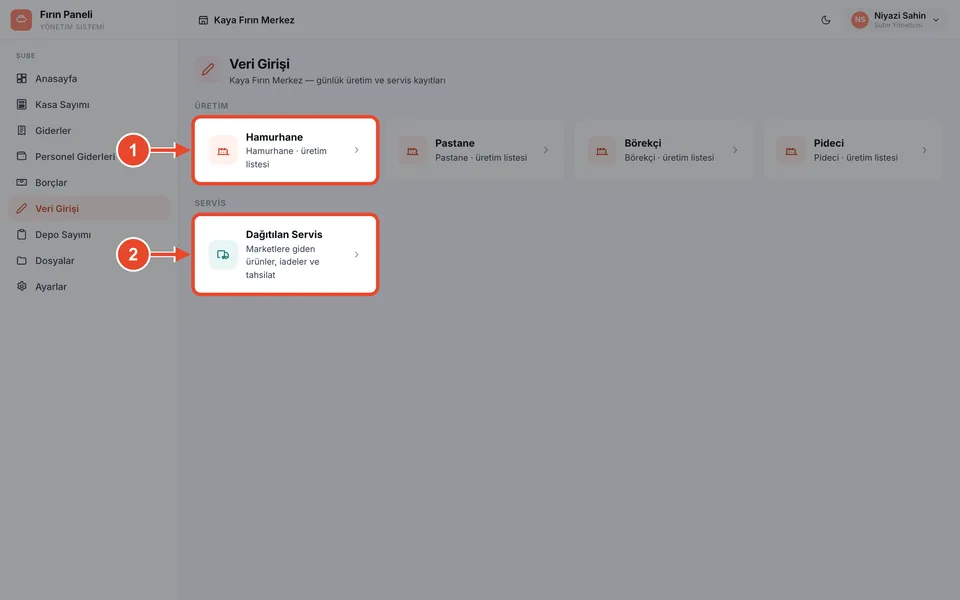
Step 2Web panel
Data entry
Complete missing production or delivery records from the computer.
- Production lists (Hamurhane, Pastane…).
- Deliveries: goods sent to markets, returns and collections.
-
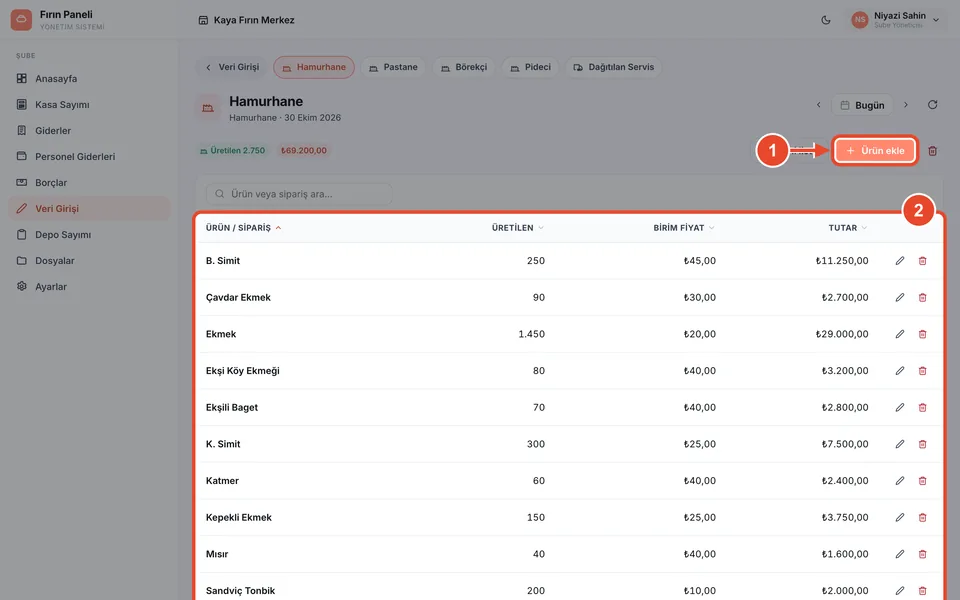
Step 3Web panel
Production list
The list is shown as a table; edit rows or add products.
- Add a product.
- The day's production: quantity, unit price and total.
-
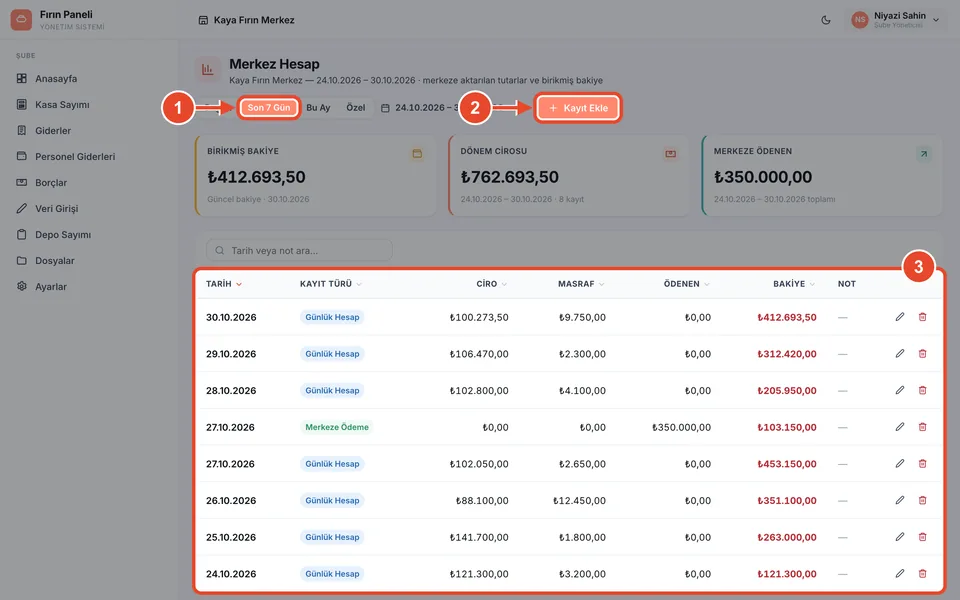
Step 4Web panel
Head-office account
Follow the running balance, period revenue and payments to head office for any date range.
- Choose the date range.
- Add an entry.
- Daily entries and balance.
Production staff
Enter and correct the day's production list.
Production staff
Enter the day's production list
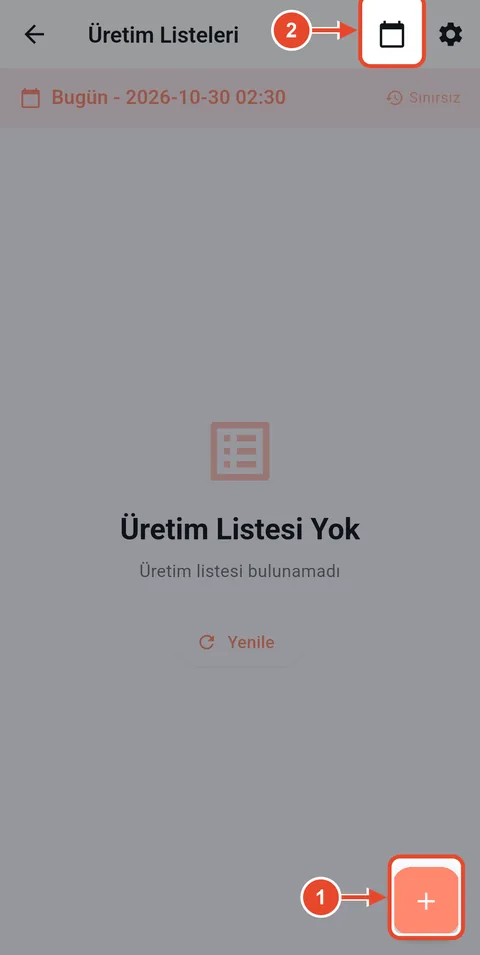
When a baker signs in, the Üretim Listeleri (production lists) screen for their own category opens.
-
Step 1Mobile app
Production lists
If there is no list for today, open a new one.
- Tap + to start a new production list.
- Pick a date to see another day's list.
-
Step 2Mobile app
Add products
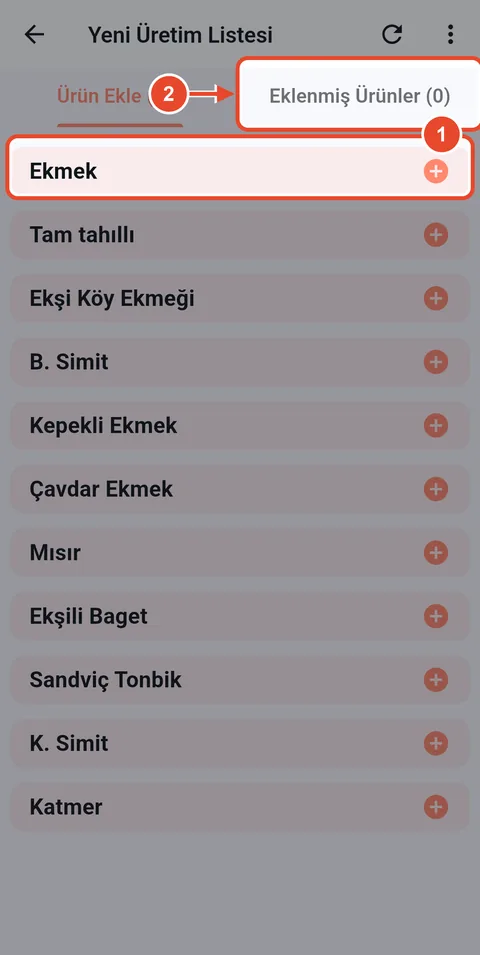
The Ürün Ekle tab lists every product in your category.
- Tap the product you made.
- Products you add collect in this tab.
-
Step 3Mobile app
Enter the quantity
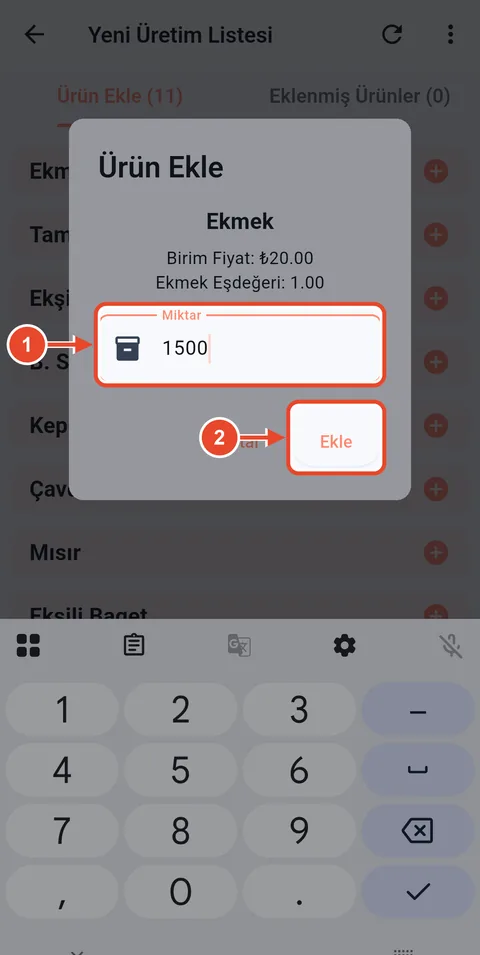
- Quantity produced.
- Tap Ekle. It is saved straight away.
-
Step 4Mobile app
Added products
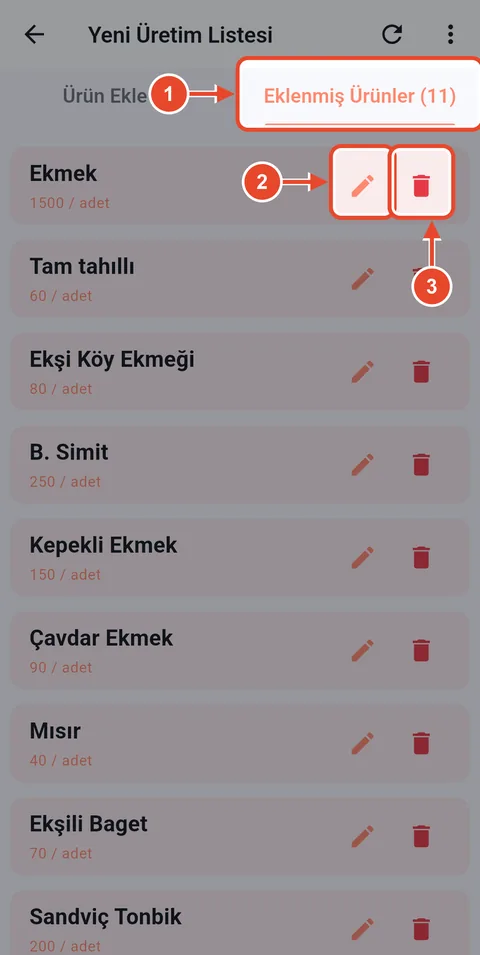
When you have added everything, check the list.
- The Eklenmiş Ürünler (added) tab.
- Pencil: change the quantity.
- Bin: remove a product added by mistake.
Production staff
Correct a quantity
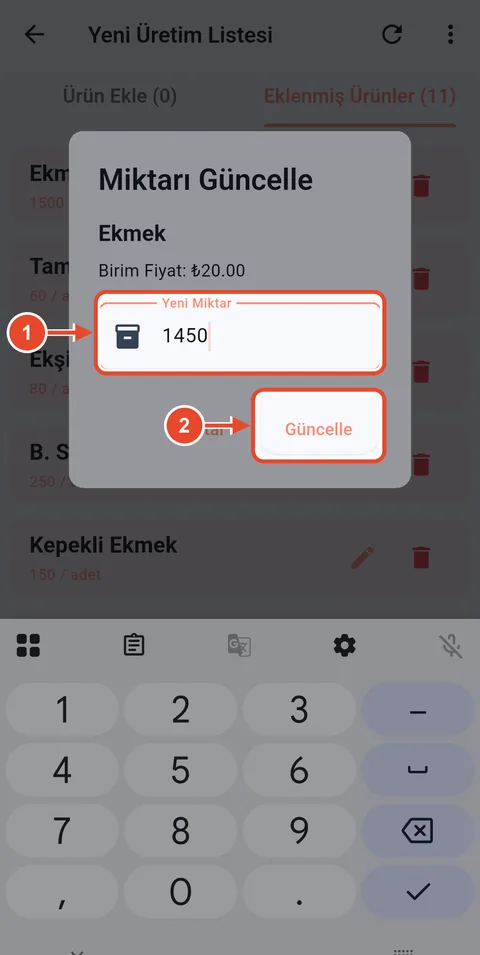
You can correct a quantity entered by mistake. Your manager decides how many past days you can see.
-
Step 1Mobile app
Update the quantity
In the Eklenmiş Ürünler tab tap the product's pencil.
- Type the correct quantity.
- Tap Güncelle.
-
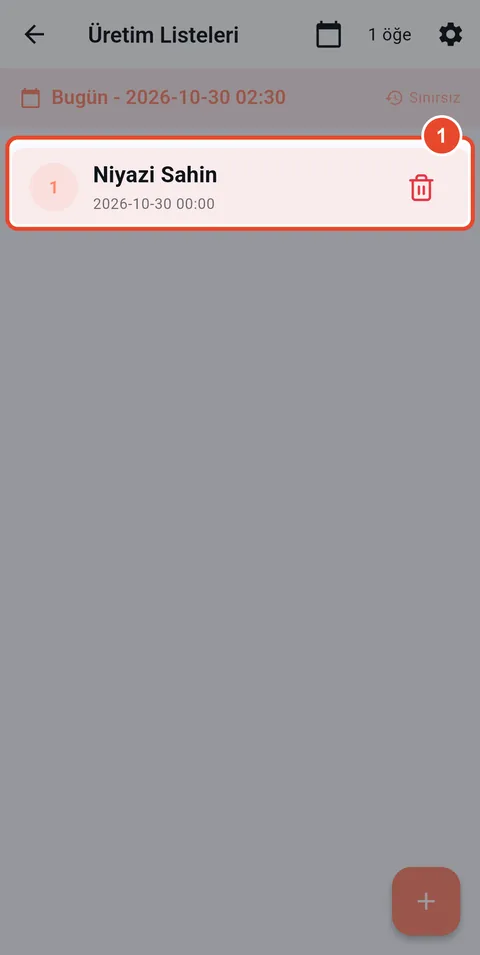
Step 2Mobile app
Today's list
The day's list appears on the production lists screen; tap it to keep editing.
- Today's production list.
Production staff
Add a special order
Add items that are not in the list, such as a cake order, as an order.
-
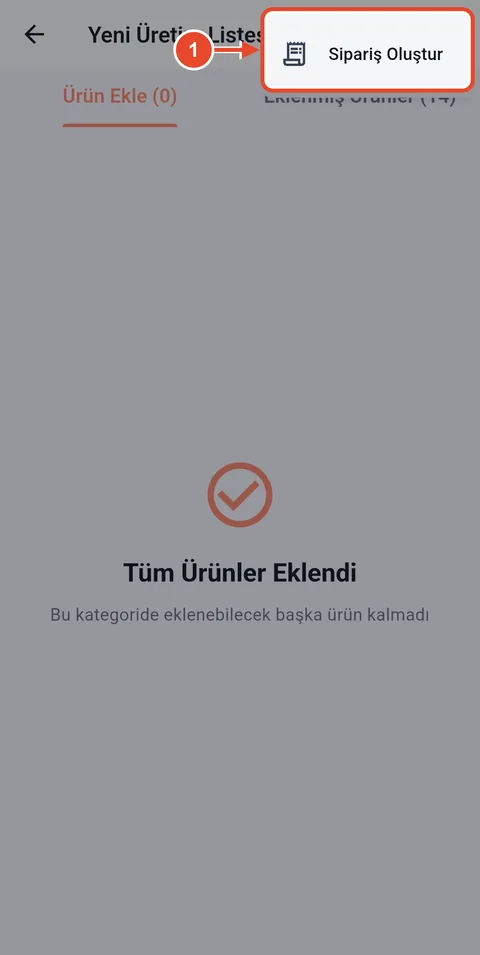
Step 1Mobile app
Create an order
Open the three-dot menu at the top right of the production list.
- Tap Sipariş Oluştur (create order).
-
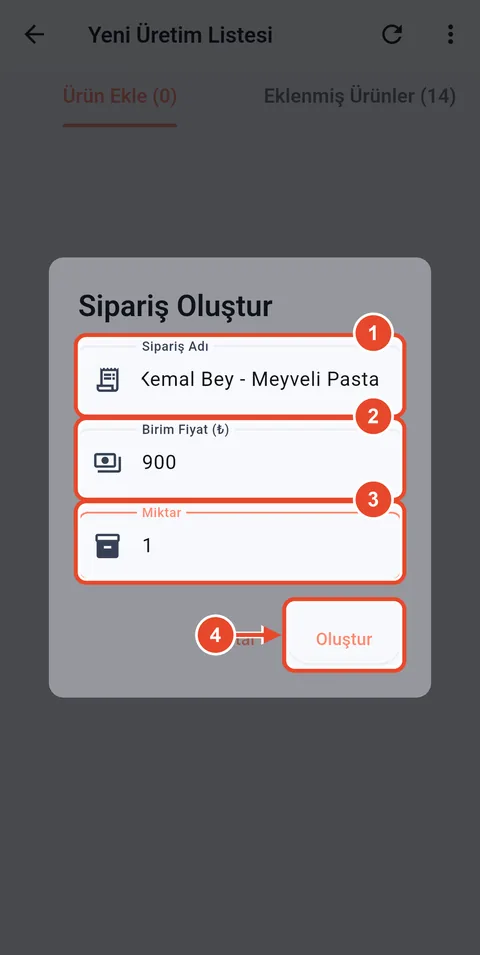
Step 2Mobile app
Order details
- Order name (e.g. customer and product).
- Unit price.
- Quantity.
- Tap Oluştur (create).
-
Step 3Mobile app
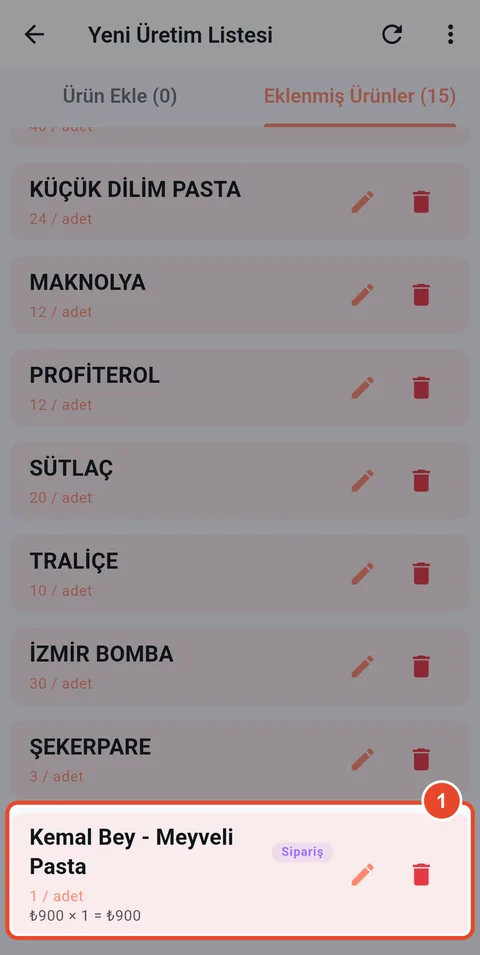
Order in the list
The order appears at the end of the list with a "Sipariş" tag and its total; it counts as fully sold.
- The added order.
Production staff
Products handed to delivery
Categories set to "delivered to service", such as Börekçi, have an extra hand-over button on the production screen.
-
Step 1Mobile app
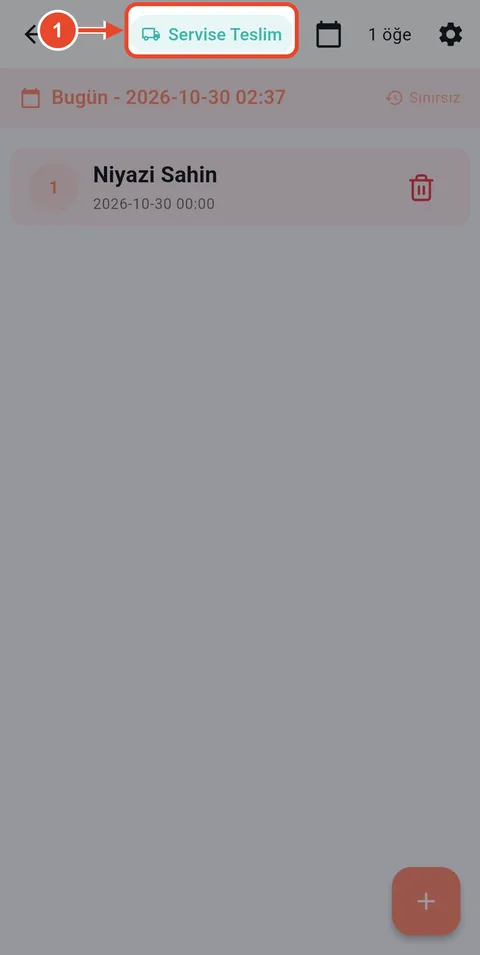
Servise Teslim
This button opens the delivery screen where you enter goods going to markets. It is the same screen described in the Delivery driver section.
- Tap Servise Teslim (hand over to delivery).
Counter (sales support)
Expenses, delivery hand-overs, end-of-day count and cash.
Counter (sales support)
The counter screen
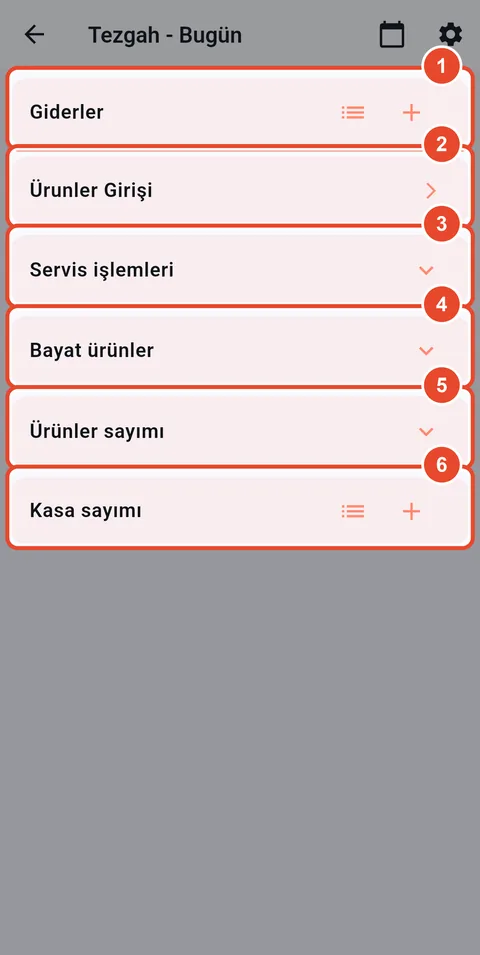
When counter staff sign in, the Tezgah (counter) screen opens. Expenses, delivery hand-overs, the end-of-day count and the till are entered here.
-
Step 1Mobile app
Counter sections
- Giderler: daily expenses.
- Ürünler Girişi: goods arriving at the counter.
- Servis işlemleri: goods given to delivery, stale goods and money from the driver.
- Bayat ürünler: goods that went stale at the counter.
- Ürünler sayımı: what is left at the end of the day.
- Kasa sayımı: the end-of-day till.
Counter (sales support)
Enter an expense
Enter every expense paid from the till with its type; the general account lists expenses by type.
-
Step 1Mobile app
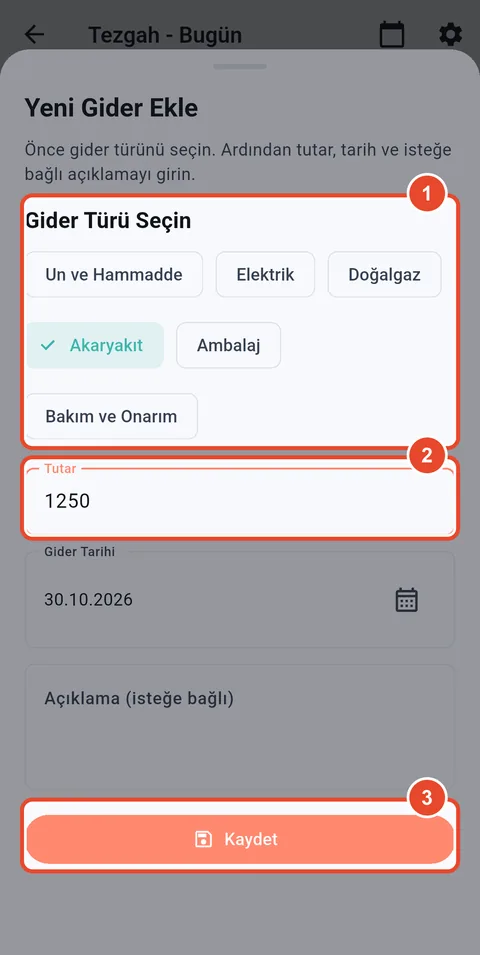
New expense
Tap + on the Giderler row.
- Choose the expense type.
- Type the amount.
- Tap Kaydet.
Counter (sales support)
Hand goods to delivery and receive the money
Record the goods you give the driver and the money the driver brings back.
-
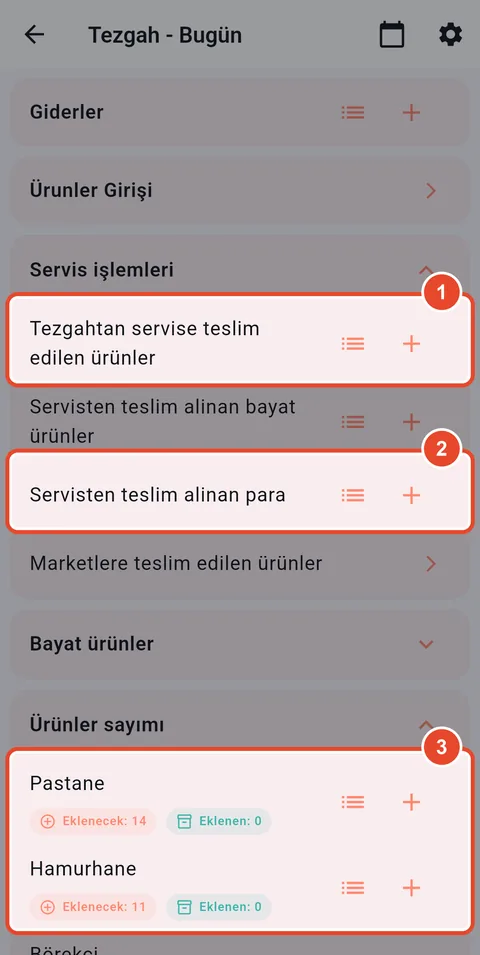
Step 1Mobile app
Delivery operations
Unfold the Servis işlemleri section.
- Goods given to delivery: add with +, view with the list icon.
- Money received from delivery.
- End-of-day product count.
-
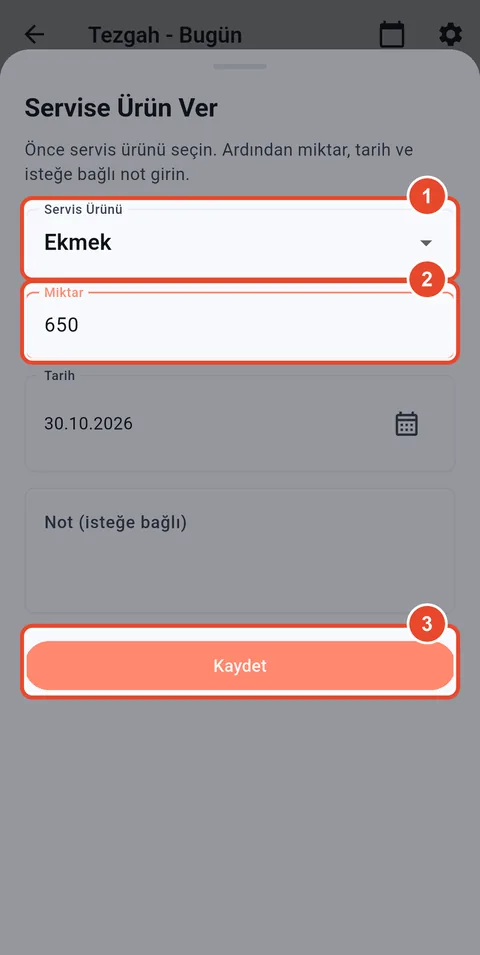
Step 2Mobile app
Give goods to delivery
- Choose the delivery product.
- Type the quantity.
- Tap Kaydet.
-
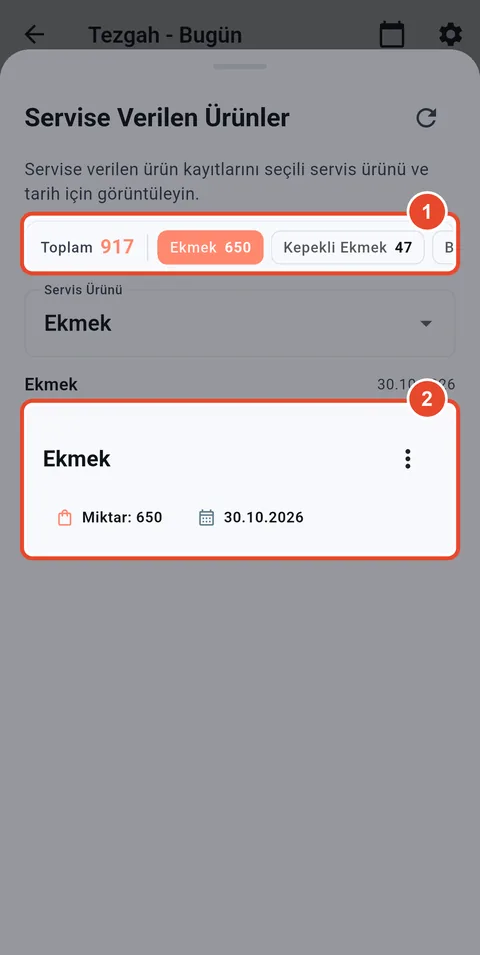
Step 3Mobile app
Goods given
The list icon shows the day's records.
- Totals per product.
- A record. Use its menu to correct it.
-
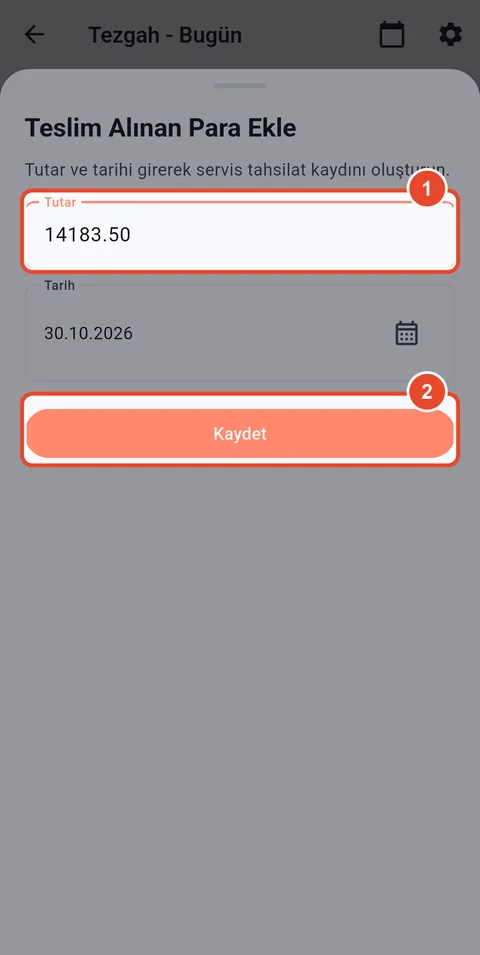
Step 4Mobile app
Receive money from delivery
Enter the amount when the driver hands over the collections.
- Amount received.
- Tap Kaydet.
Counter (sales support)
End-of-day product count
At the end of the day count what is left on the counter. Units sold are worked out automatically from production, stale goods and deliveries.
-
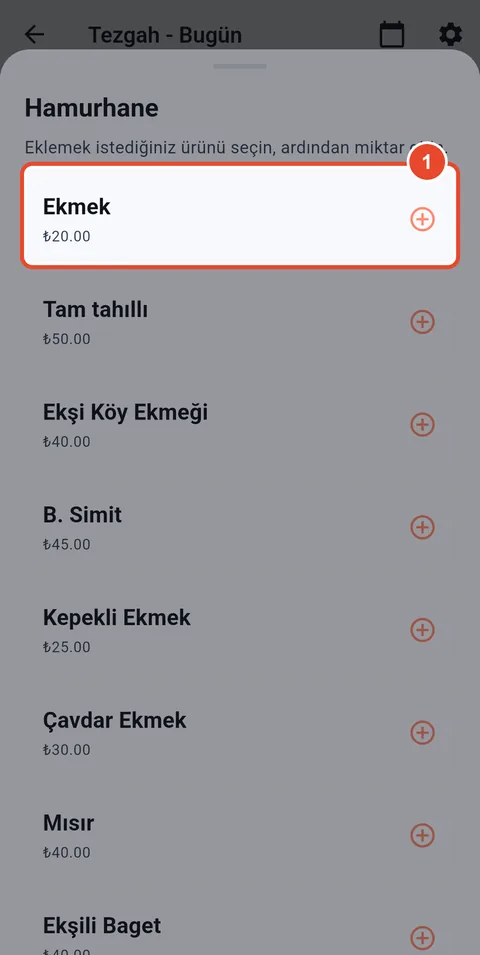
Step 1Mobile app
Open the category
In Ürünler sayımı tap + on the category.
- Tap the product you counted.
-
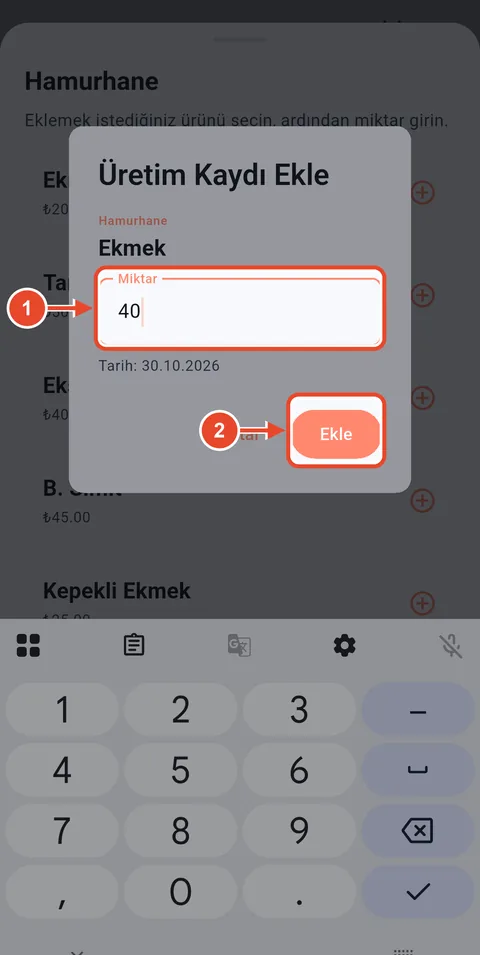
Step 2Mobile app
Enter what is left
- Units left on the counter.
- Tap Ekle.
-
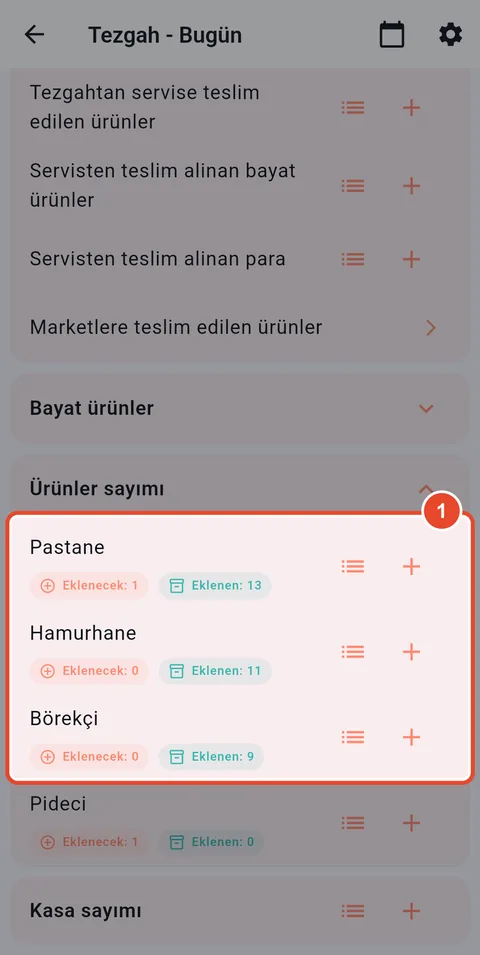
Step 3Mobile app
Count complete
Each category shows how many items are still to count. When it reaches 0 that category is done.
- Count status per category.
Counter (sales support)
Cash count
Count the till at the end of the day and enter it. The manager adds the cash taken and checks it.
-
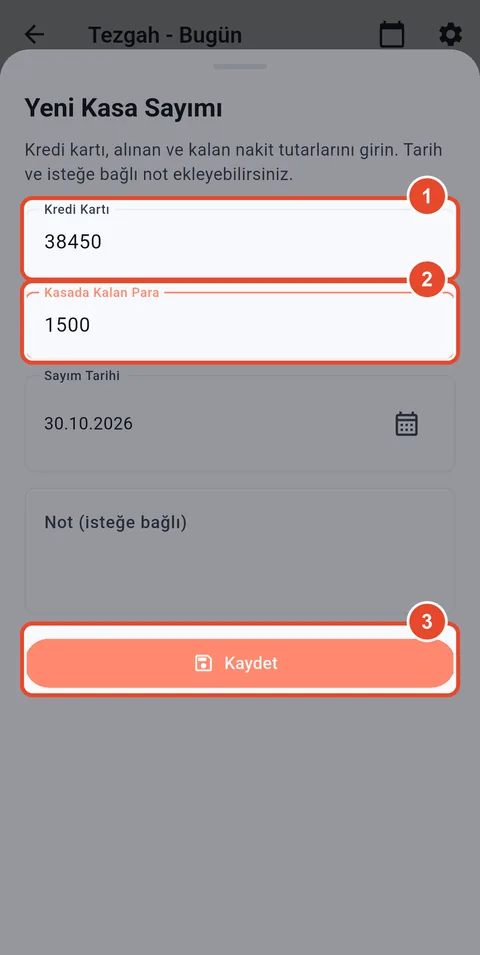
Step 1Mobile app
New cash count
Tap + on the Kasa sayımı row.
- The day's card total (POS report).
- Cash left in the till.
- Tap Kaydet.
Delivery driver
Deliveries, stale returns, collections and market balances.
Delivery driver
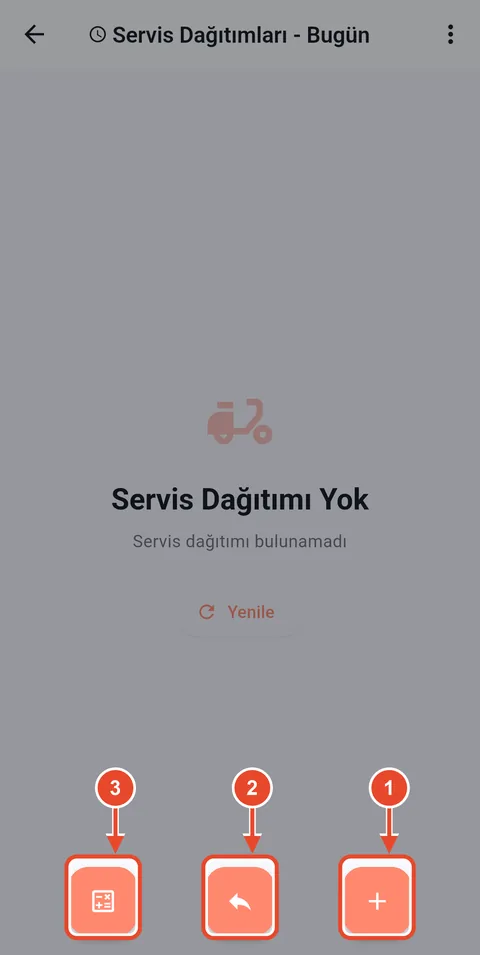
The delivery screen
When a driver signs in, the day's deliveries screen opens.
-
Step 1Mobile app
Deliveries
- Start a new delivery round.
- Stale goods returned by markets.
- Delivery account: collections and debts.
-
Step 2Mobile app
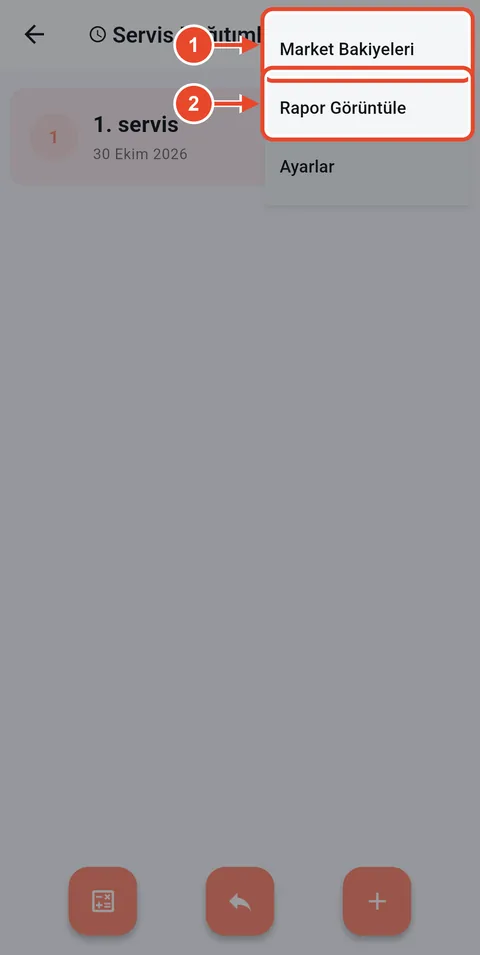
More actions
The three-dot menu at the top right.
- Market balances: what each market owes.
- The day's delivery report.
Delivery driver
Enter deliveries to markets
Each delivery round is one record (1. servis, 2. servis…). Enter what you left at each market.
-
Step 1Mobile app
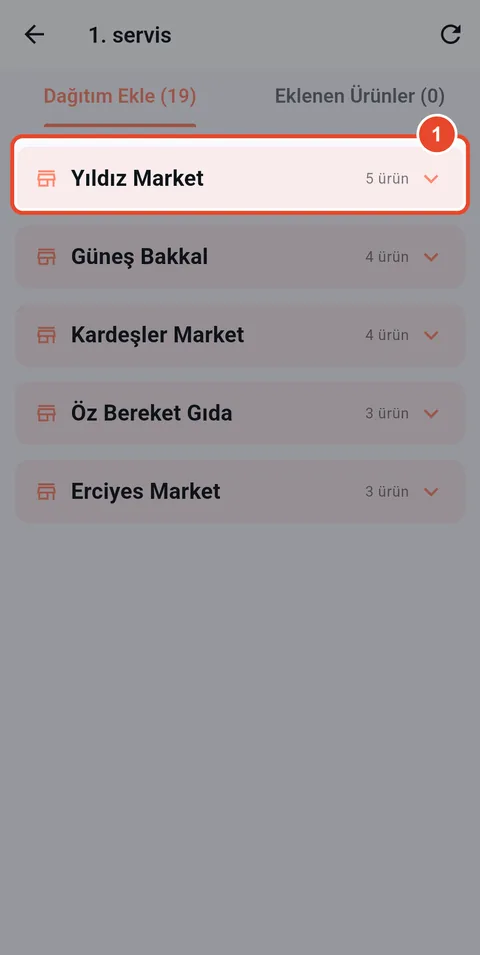
Choose the market
When a round starts, every market with prices is listed.
- Tap a market to show its products.
-
Step 2Mobile app
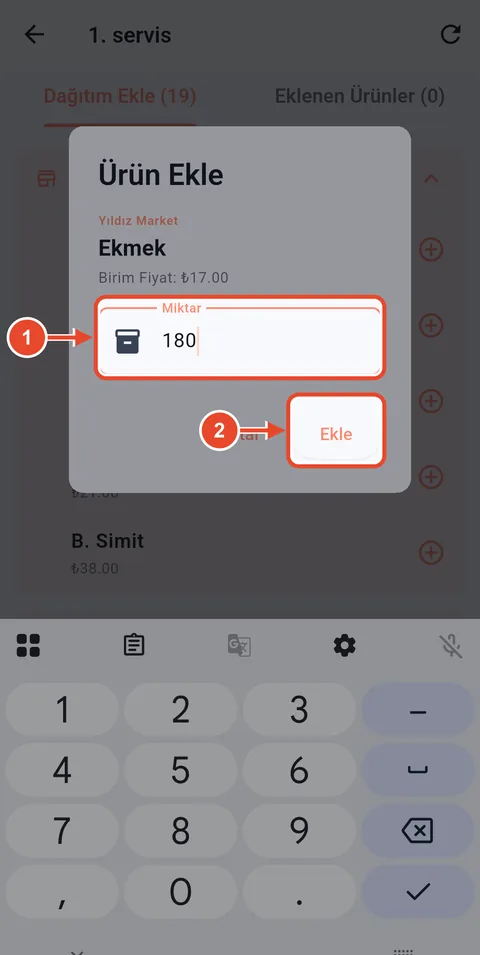
Enter the quantity
Tap a product and type how many you left.
- Quantity delivered.
- Tap Ekle.
-
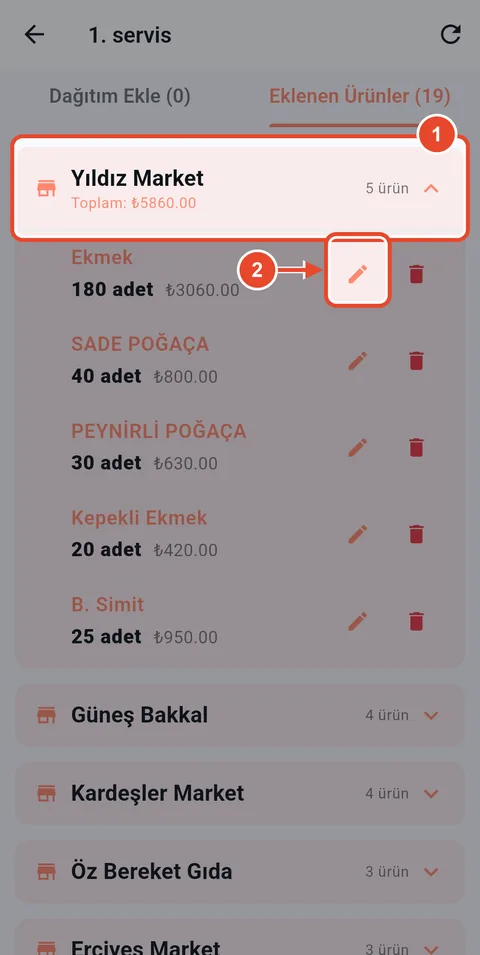
Step 3Mobile app
Added products
The total per market is calculated automatically.
- The market's products and total.
- Pencil: correct a quantity.
-
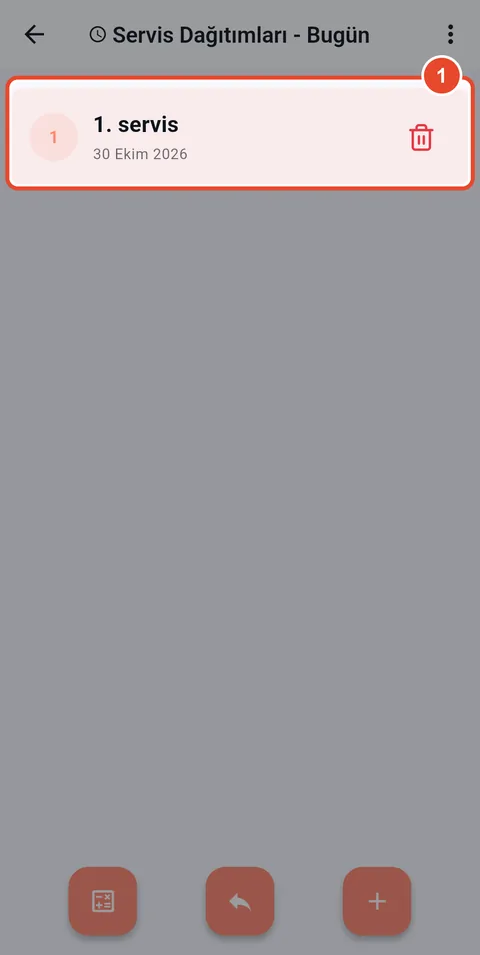
Step 4Mobile app
Today's rounds
The home screen lists today's rounds. For a second round, tap + again.
- Today's first round.
Delivery driver
Enter stale returns
Enter the stale goods you took back from markets; they are deducted from the market's account.
-
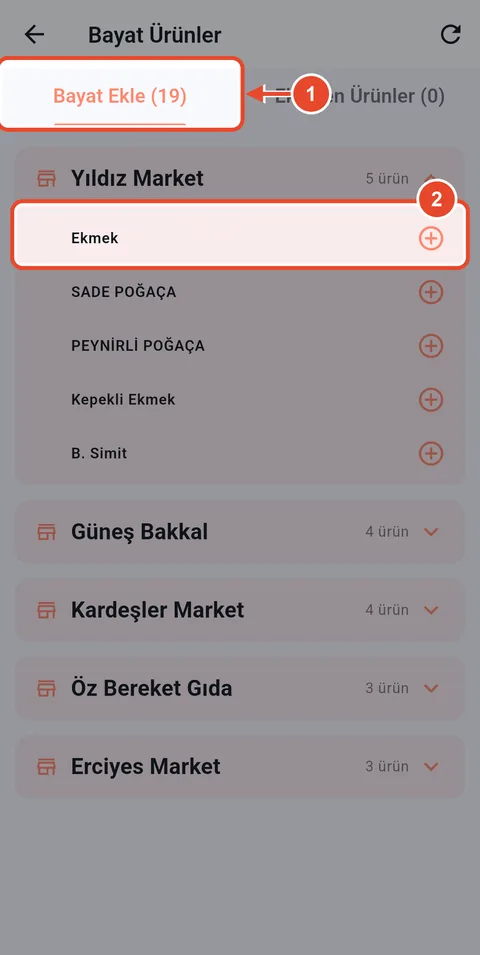
Step 1Mobile app
Stale products
On the home screen tap Bayat Ürünler and open the market.
- The Bayat Ekle tab.
- The returned product.
-
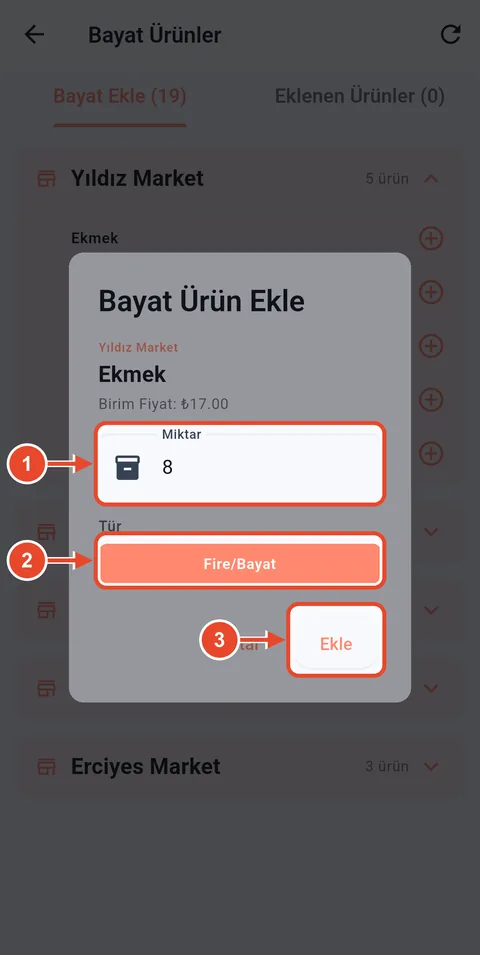
Step 2Mobile app
Quantity and type
- Quantity returned.
- Type: Fire/Bayat (waste/stale), or Geri Dönüştür for goods that go back into dough.
- Tap Ekle.
-
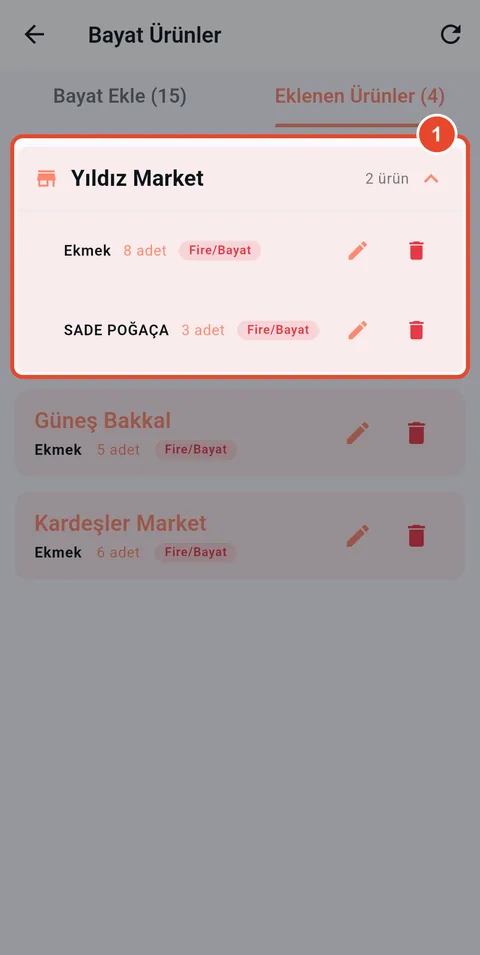
Step 3Mobile app
Returns added
- What the market returned.
Delivery driver
Collections and debts
Collect payment when the market pays; if it does not, record it as debt.
-
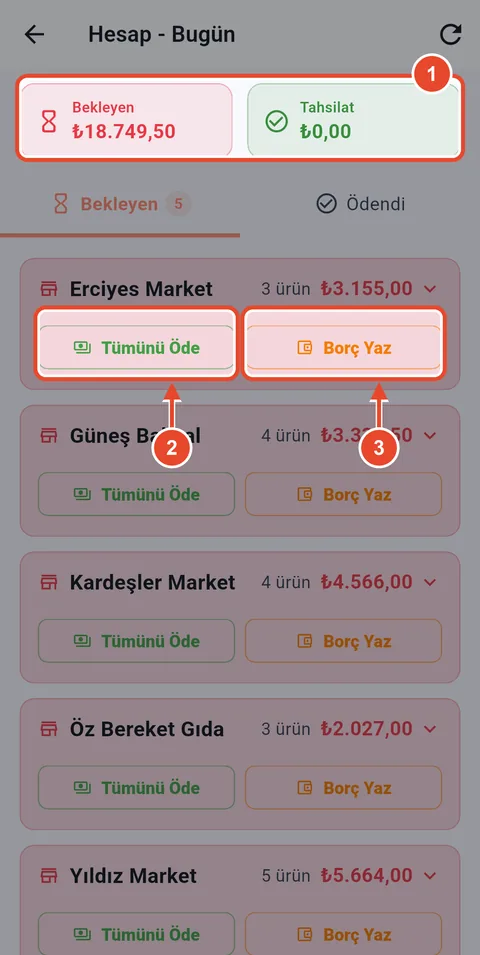
Step 1Mobile app
Delivery account
On the home screen tap Servis Hesabı.
- Pending and collected amounts.
- Market paid: Tümünü Öde.
- Market did not pay: Borç Yaz.
-
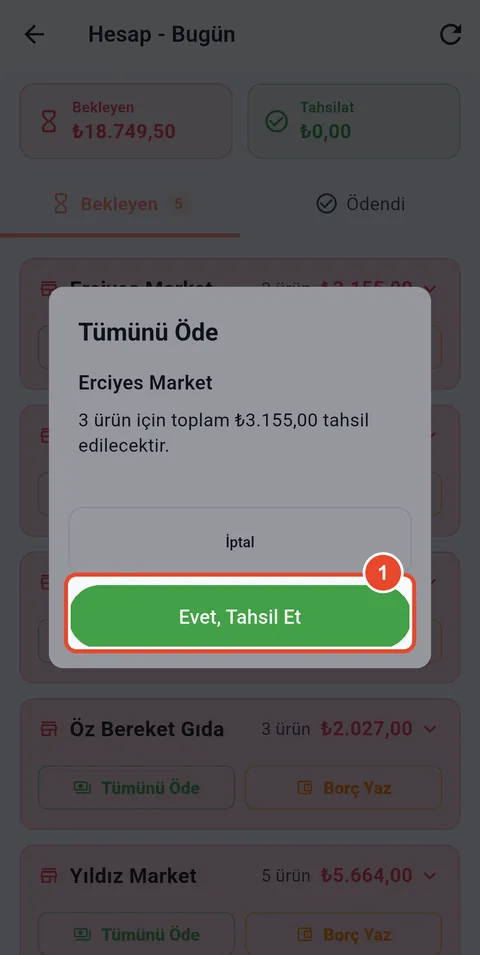
Step 2Mobile app
Collect
- Tap Evet, Tahsil Et (yes, collect).
-
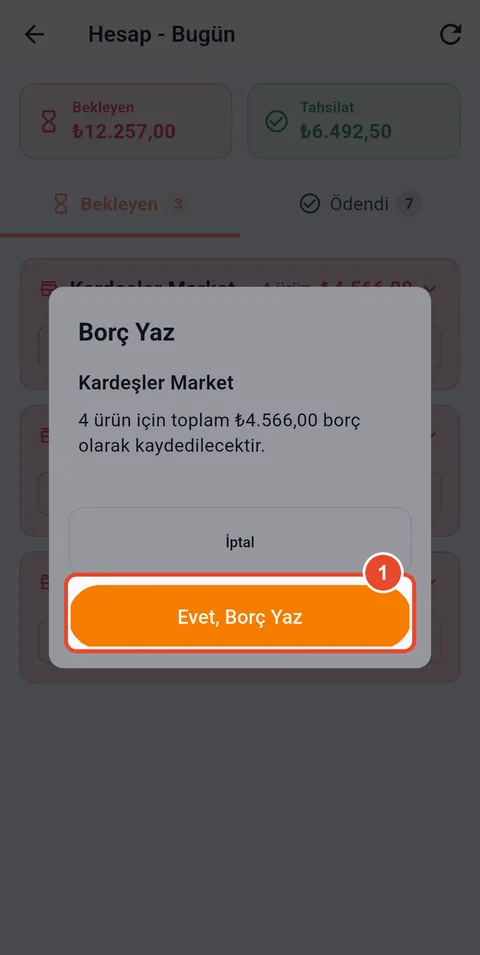
Step 3Mobile app
Record debt
The debt is added to the market's balance.
- Tap Evet, Borç Yaz (yes, record debt).
-
Step 4Mobile app
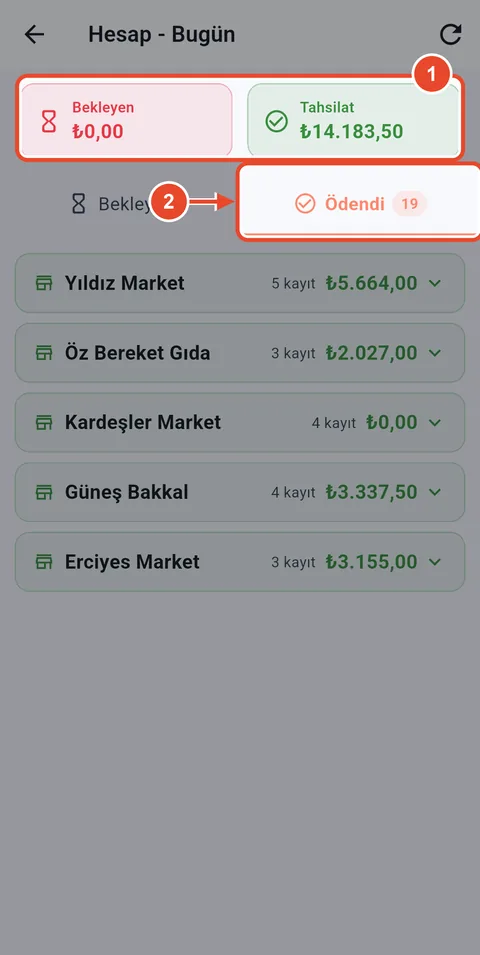
Today's collections
Once every market is handled, the pending amount drops to zero.
- Total collected.
- Handled markets are under the Ödendi tab.
Delivery driver
Market balance and payments
See markets that owe money under Market Bakiyeleri in the menu, and record a payment when a market settles an old debt.
-
Step 1Mobile app
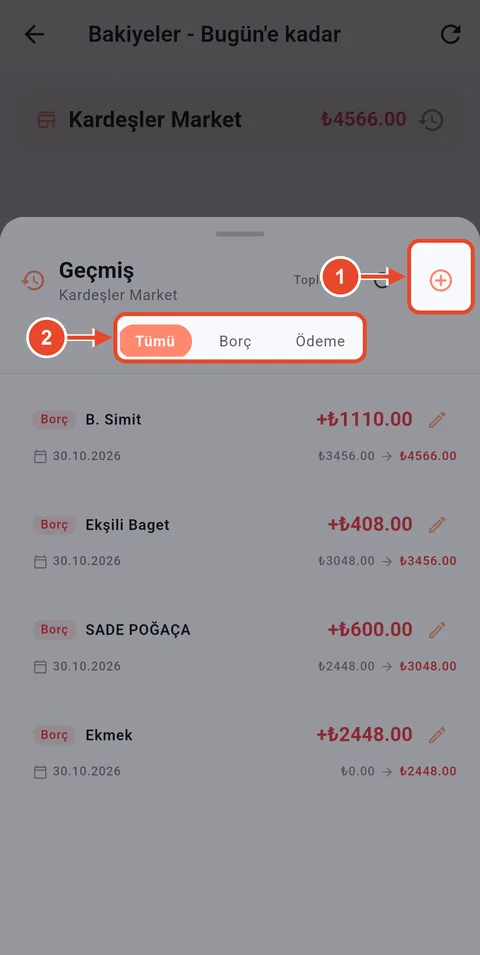
Balance history
Tapping a market lists all of its debts and payments.
- Add a balance entry.
- Show debts or payments only.
-
Step 2Mobile app
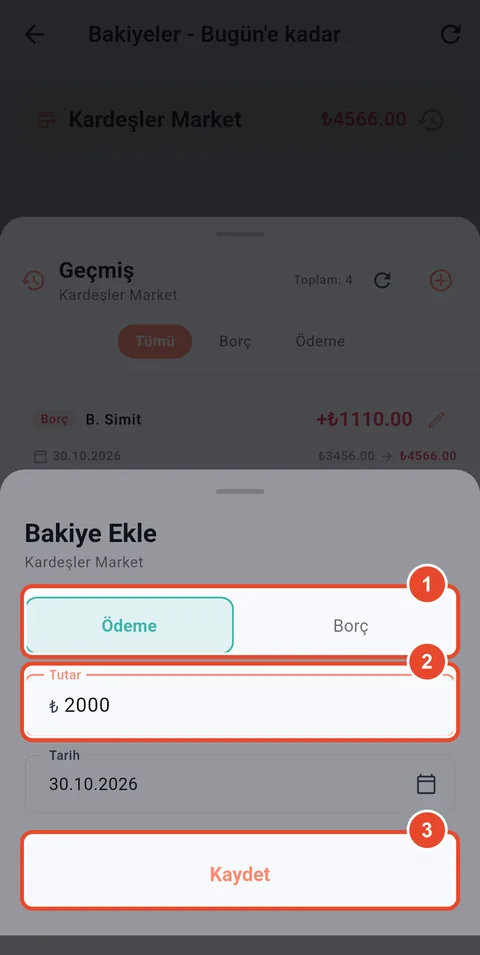
Record the payment
- Choose Ödeme (payment).
- Amount received.
- Tap Kaydet.